
Salted White Chocolate Peanut Butter Balls

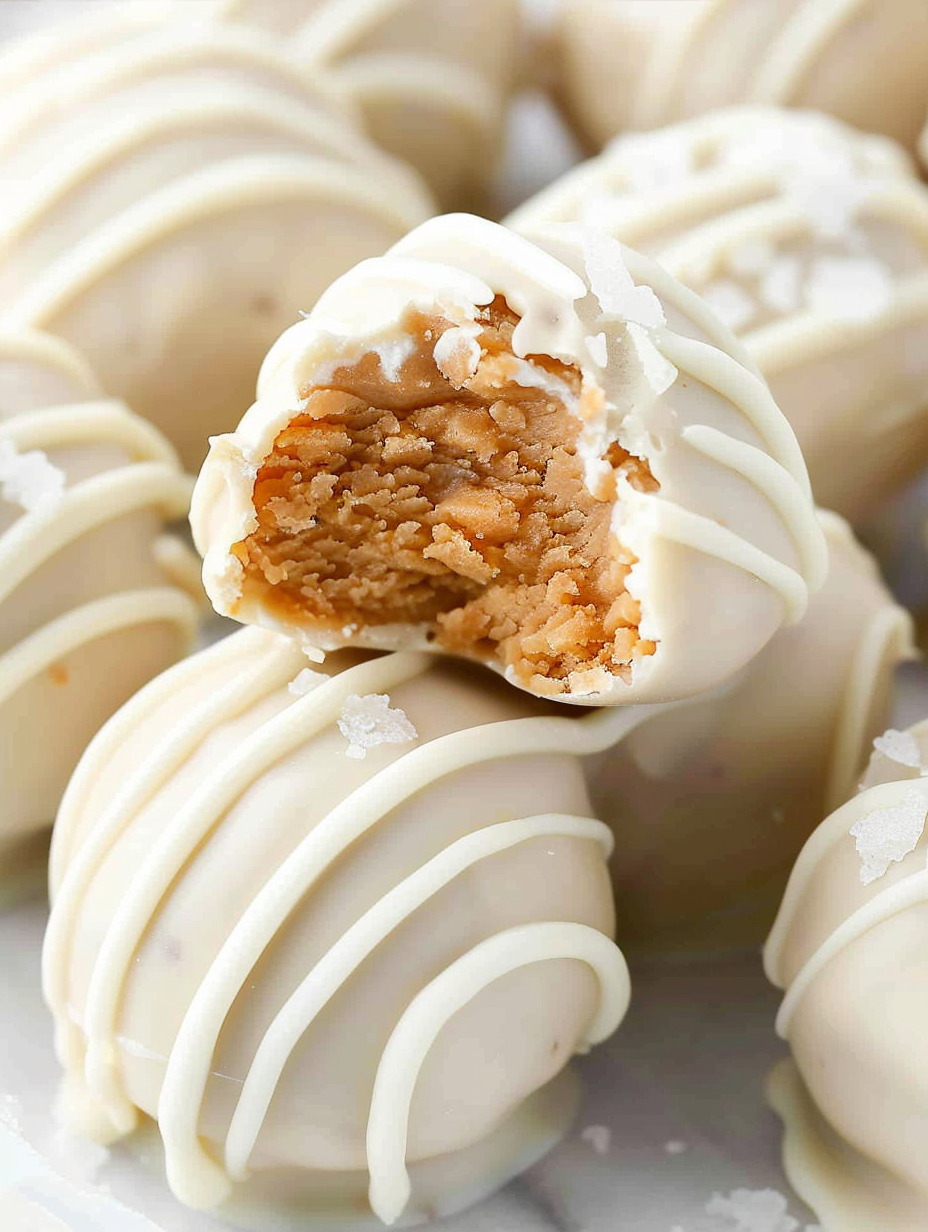
Creamy peanut butter centers enrobed in sweet white chocolate with a sprinkle of flaked sea salt — a simple, crowd-pleasing holiday treat.
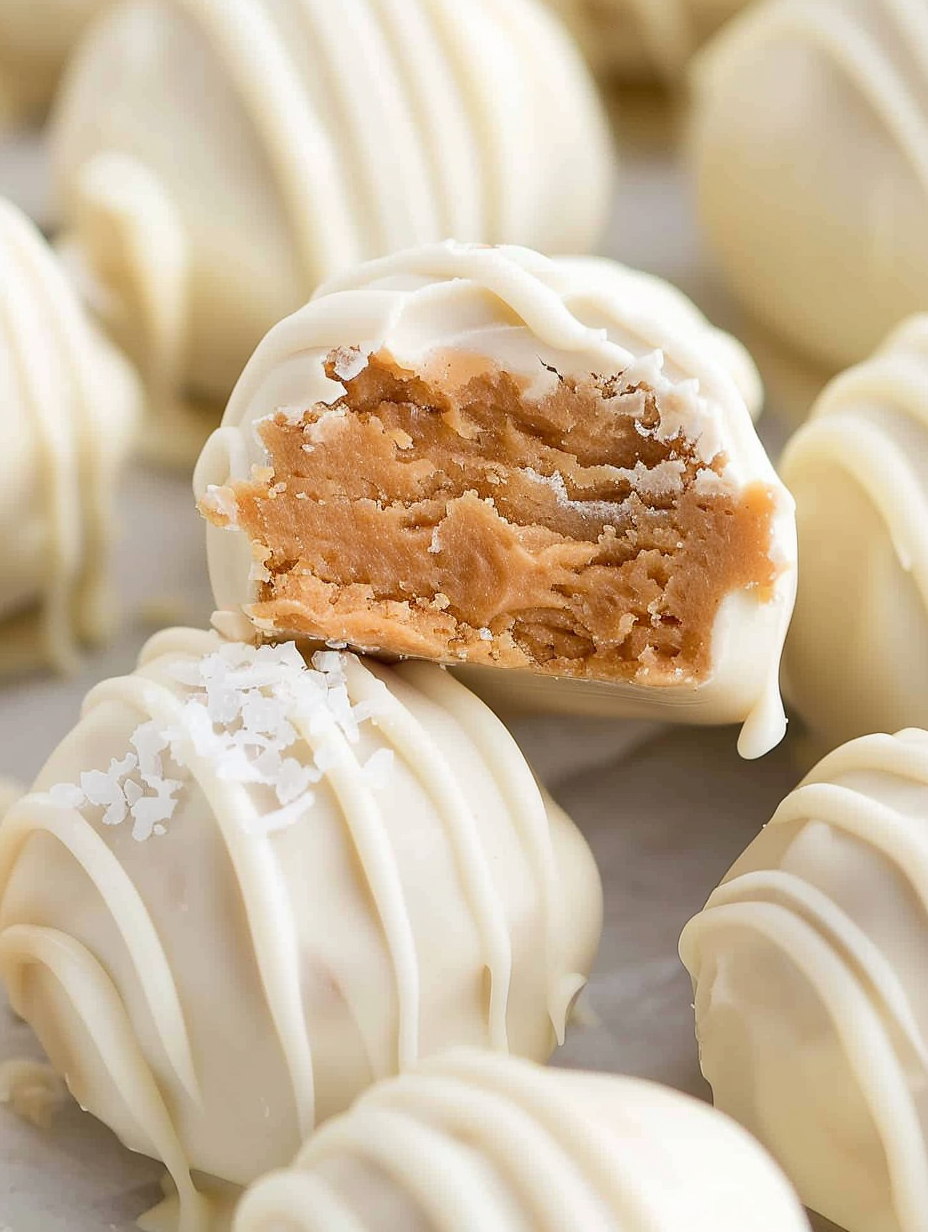
This batch of salted white chocolate peanut butter balls is my go-to when I need a quick, impressive treat for holidays, potlucks, or just a cozy night in. I first developed this version during a December week when I wanted something faster than cookies but more special than a bowl of candy. The filling is rich and smooth, and the white chocolate gives a delicate sweetness that balances perfectly with a final pinch of flaked sea salt. Every single time I bring a tray to a gathering, they disappear first.
What makes these special is the texture contrast: a dense, slightly crumbly peanut butter center that melts into silky white chocolate. I use a creamy no-stir peanut butter so the filling stays stable without adding extra oil. The recipe is forgiving, requires no baking, and can be completed in under an hour, including chilling time. It’s one of those recipes I reach for when I want maximum impact with minimal fuss.
Why You'll Love This Recipe
- Ready in about 45 minutes from start to finish, including chilling time, so it’s perfect for last-minute treats and spontaneous entertaining.
- Uses pantry-friendly ingredients like peanut butter, cane sugar, and white chocolate chips — no specialty shopping necessary.
- Make-ahead friendly: centers can be formed and frozen for a week, then dipped the day you need them, saving time on busy holiday schedules.
- Dietary wins: naturally gluten-free when using certified gluten-free ingredients and adaptable to different sweetness levels by adjusting powdered sugar.
- Crowd-pleaser: the sweet white chocolate and the faint salt finish hit broad palates, which makes these ideal for gift boxes, cookie trays, or party platters.
- Minimal equipment and no oven required — great for apartment kitchens or when the oven is already busy.
My family loves that these feel indulgent but are small — a couple of bites of bliss. I still remember making them on a snowy afternoon; my nephew kept sneaking truffles from the sheet. They’re simple enough to let helpers pitch in with rolling and dipping, yet the final product always reads like it took more effort than it did.
Ingredients
- Creamy no-stir peanut butter (3/4 cup): Use a stable, no-stir brand so you don’t need to mix in oil. This gives a smooth, consistent texture to the center; I like Skippy No-Stir or a similar jar. Avoid natural runny styles unless you chill and drain excess oil first.
- Cane sugar (1/2 cup): Adds fine-grain sweetness and slight structure. If you prefer a less gritty finish, you can substitute with superfine sugar.
- Salt (1/8 teaspoon): A small amount inside the center enhances flavor and balances sweetness. If using salted peanut butter, reduce this to a pinch or omit.
- Coconut flour (1/4 cup): Acts as a light binder without gluten; it soaks up moisture efficiently so the centers are firm and hold their shape. Measure precisely — coconut flour is highly absorbent.
- Powdered sugar (2 tablespoons): Smooths the texture and helps the centers set; sift if lumpy. Adjust slightly if you prefer a firmer or softer interior.
- White chocolate baking chips (2 cups): Use good-quality chips or couverture for smooth melting and a glossy finish. Brands like Ghirardelli or Callebaut (white chocolate callets) work beautifully.
- Flaked sea salt (for topping): Adds a final, fragrant crunch that contrasts the sweetness. Maldon or similar flaky sea salt is my favorite.
Instructions
Mix the filling: In a large mixing bowl, beat together 3/4 cup creamy no-stir peanut butter, 1/2 cup cane sugar, 1/8 teaspoon salt, 1/4 cup coconut flour, and 2 tablespoons powdered sugar until well combined. The mixture should be cohesive but slightly tacky; overworking will dry it out. If it feels too soft, add an extra 1 teaspoon coconut flour at a time. Form the balls: Use a mini cookie scoop (about 1 tablespoon) or damp hands to portion the mixture into uniform balls. Place each on a baking sheet lined with wax paper. Aim for 10 to 12 pieces; uniform size helps them set evenly. Lightly press each ball to remove air pockets for a smoother finish. Chill until firm: Freeze the sheet for 20 minutes. The centers must be cold so the white chocolate doesn’t seize on contact. If you’re prepping ahead, freeze for up to an hour; wrap and store in an airtight container for longer storage. Melt the coating: Place 2 cups white chocolate chips in a microwave-safe bowl and heat in 20 to 30 second bursts, stirring between bursts until smooth. Be careful not to overheat; white chocolate burns quickly and becomes grainy. A double boiler works well if you prefer gentler heating. Dip and coat: Return the peanut butter balls to the counter and dip one at a time in the melted chocolate. Spoon chocolate over the ball to coat completely or use a dipping fork. Tap the fork on the bowl to remove excess chocolate, then slide the ball back onto the wax paper with a toothpick. Work quickly so the centers stay chilled. Top and set: While the coating is still wet, sprinkle with a small pinch of flaked sea salt. Once all balls are dipped, refrigerate for 15 minutes until the chocolate sets completely. Finish with a drizzle: Warm a small amount of the remaining white chocolate, transfer to a small zipper bag, and snip a tiny corner. Drizzle over the tops for texture and visual interest. Return to the refrigerator until fully hardened, about 10 more minutes.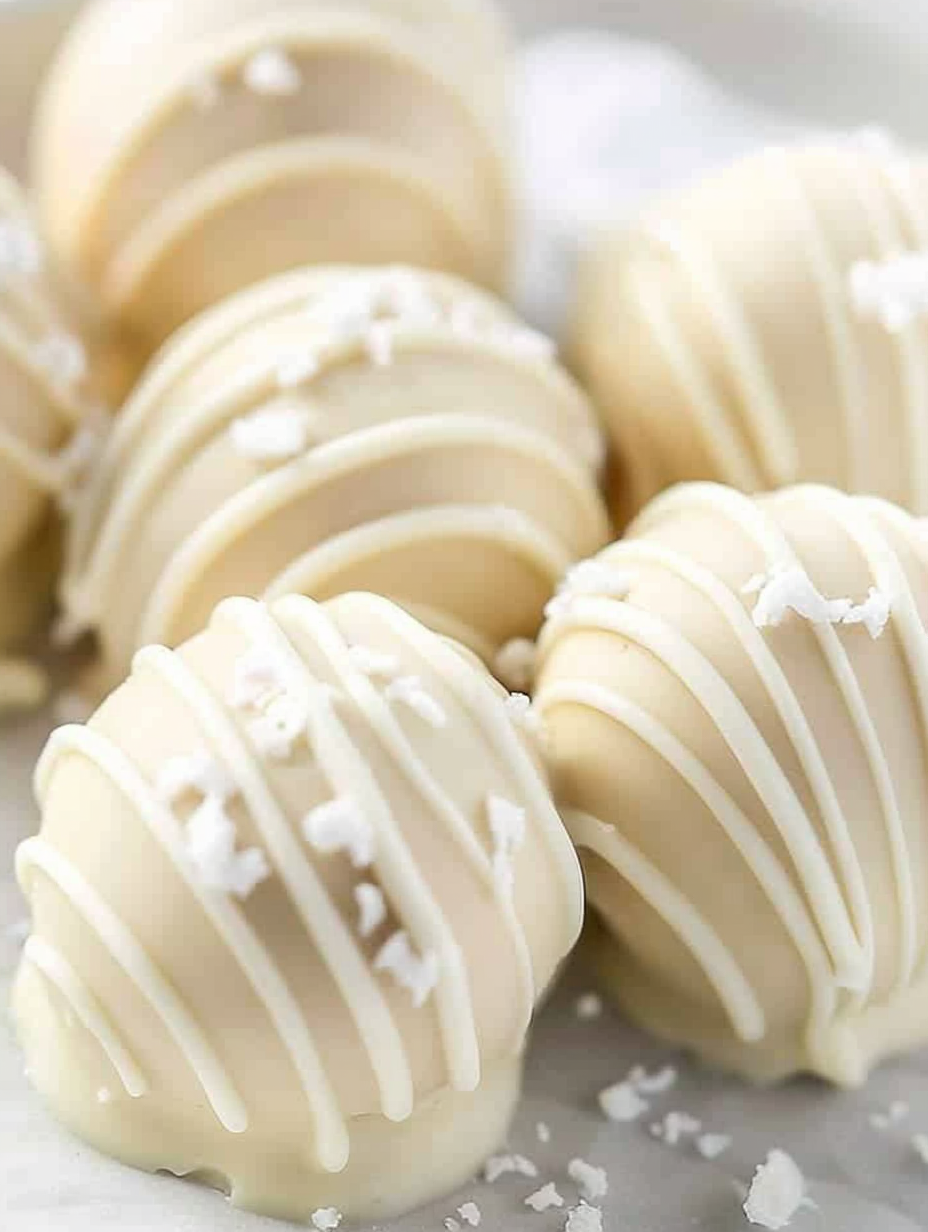
You Must Know
- These keep well in the refrigerator for up to 2 weeks in an airtight container and freeze excellently for 3 months; thaw in the fridge before serving.
- Because white chocolate has milk solids, they are not dairy-free or vegan unless you choose a dairy-free white chocolate alternative.
- Use room-temperature peanut butter for easier mixing but ensure centers are chilled before dipping to prevent melting the coating.
- The nutrition per ball is roughly 367 calories with about 39 grams carbohydrates and 22 grams fat — they are rich and meant for sharing in small portions.
- For the best gloss on the coating, temper white chocolate if you have the skill; otherwise work with good-quality chips and avoid overheating.
My favorite part of this process is the quick transformation from simple pantry staples to something that looks and tastes gourmet. I’ve gifted them in muffin liners with a ribbon; people assume I spent hours. Making them feels festive and efficient, and I often make a double batch because the first platter never lasts long.
Storage Tips
Store the finished pieces in a single layer in an airtight container. If stacking is necessary, separate layers with parchment or wax paper to prevent sticking. Refrigerated, they maintain best texture for two weeks; for longer storage freeze flat on a sheet, then transfer to a freezer bag for up to three months. To serve from frozen, move to the refrigerator for 30 minutes and then sit at room temperature for 10 minutes for the ideal mouthfeel. Avoid leaving them at room temperature more than two hours, especially in warm climates, to prevent softening.
Ingredient Substitutions
If you want a slightly different flavor profile, substitute half the white chocolate with milk chocolate to cut sweetness. For a nut-free option, swap peanut butter for a sunbutter or soy nut butter, though texture may change slightly and you may need an extra teaspoon of coconut flour. If you prefer less sweetness, reduce cane sugar to 1/3 cup and increase powdered sugar by 1 tablespoon for structure. For a richer filling, stir in 1 tablespoon unsalted melted butter, noting it will change refrigeration behavior slightly.
Serving Suggestions
Arrange on small cupcake liners for a polished presentation. Pair with robust coffee, espresso, or a glass of cold milk to balance the sweetness. For holiday platters, scatter roasted nuts and dried cranberries around the tray for color contrast. These are perfect as small favors; package five to six in a clear cellophane bag tied with twine for an elegant, homemade gift.
Cultural Background
Chocolate-coated nut confections have a long tradition across many cultures; truffles are classically European, while candy-coated nut bites are common in American holiday baking. This version blends classic truffle technique with an American love of peanut butter and white chocolate. The finishing touch of flaked sea salt is a more modern trend that elevates confections by balancing sweetness — a technique borrowed from both artisan chocolatiers and contemporary home bakers.
Seasonal Adaptations
For winter holidays, fold in 1/4 teaspoon ground cinnamon to the filling or top with crushed peppermint for a festive twist. In summer, keep them chilled and serve alongside berries to offset richness. For Valentine’s Day, tint a small portion of melted white chocolate pink with oil-based coloring and drizzle for a romantic presentation. Small changes in garnish can make these appropriate for any season.
Meal Prep Tips
Make centers ahead and freeze on a sheet for up to a month; when ready to serve, warm chocolate and dip straight from frozen — dipping time will be slightly longer. Label containers with date and flavor notes. If packaging for lunches or gifting, add a small desiccant pack to absorb any moisture and keep the coating crisp. Portion control is easy since each piece is a single serving.
These salted white chocolate peanut butter balls are a reliable, delicious addition to any dessert rotation. They’re quick, adaptable, and always well received. Give them a try the next time you need a sweet that travels well, stores easily, and tastes like a little luxury.
Pro Tips
Chill the centers thoroughly before dipping so the coating sets quickly and stays smooth.
Heat white chocolate in short bursts and stir between intervals to prevent scorching.
Use a mini cookie scoop for uniform sizes so all pieces set and present evenly.
Work in small batches to keep the remaining centers cold while dipping.
This nourishing salted white chocolate peanut butter balls recipe is sure to be a staple in your kitchen. Enjoy every moist, high protein slice — it is perfect for breakfast or as a wholesome snack any time.
FAQs about Recipes
How long do these keep?
Store in the refrigerator for up to two weeks or freeze for up to three months. Thaw in the fridge before serving.
Can I make these dairy-free or vegan?
Use dairy-free white chocolate chips and a dairy-free peanut butter alternative; note texture and flavor will differ.
Tags
Salted White Chocolate Peanut Butter Balls
This Salted White Chocolate Peanut Butter Balls recipe makes perfectly juicy, tender, and flavorful steak every time! Serve with potatoes and a side salad for an unforgettable dinner in under 30 minutes.
Ingredients
Peanut butter filling
Coating and topping
Instructions
Combine filling ingredients
Beat 3/4 cup creamy no-stir peanut butter, 1/2 cup cane sugar, 1/8 teaspoon salt, 1/4 cup coconut flour, and 2 tablespoons powdered sugar in a bowl until cohesive and slightly sticky. Adjust with tiny amounts of coconut flour if too soft.
Portion into balls
Scoop the mixture with a mini cookie scoop or use damp hands to form 10 to 12 uniform balls. Place them on a baking sheet lined with wax paper to prevent sticking.
Chill centers
Freeze the tray for about 20 minutes until firm so the centers hold shape when dipped.
Melt white chocolate
Melt 2 cups white chocolate chips in a microwave-safe bowl in 20 to 30 second intervals, stirring between each until glossy and smooth. Alternatively use a double boiler for gentler heat.
Dip and coat
Dip chilled centers into the melted white chocolate, spooning to coat fully. Remove with a fork, tap off excess, and return to the wax paper using a toothpick.
Add salt and set
Sprinkle each coated piece with flaked sea salt while the coating is wet. Refrigerate for 15 minutes until the coating is fully set.
Drizzle and finish
Warm remaining dipping chocolate, place in a small zipper bag, snip a tiny corner, and drizzle over tops for texture. Chill again until completely hardened before serving.
Last Step: Please leave a rating and comment letting us know how you liked this recipe! This helps our business to thrive and continue providing free, high-quality recipes for you.
Nutrition
Did You Make This?
Leave a comment & rating below or tag
@feastinarecipe on social media!
Categories:
You might also like...

Lemon Chicken Orzo Soup
Cozy, bright, and ready fast, this Instant Pot lemon chicken orzo soup brings tender chicken, fresh veggies, and a sunny citrus finish.

50 Calorie Strawberry Cheesecakes
Feather-light mini cheesecakes with bright strawberry sauce, a tender biscuit-style base, and creamy filling. Just 47 calories each and irresistibly fresh.

Kahlua Chocolate Cheesecake Bites
Silky mini cheesecakes swirled with melted chocolate and a splash of Kahlua, nestled on Oreo crusts and crowned with fresh whipped cream.
Did You Make This?
Leave a comment & rating below or tag @feastinarecipe on social media!
Rate This Recipe
Share This Recipe
Enjoyed this recipe? Share it with friends and family, and don't forget to leave a review!
Comments (1)
This recipe looks amazing! Can't wait to try it.
Comments are stored locally in your browser. Server comments are displayed alongside your local comments.

Hi, I'm Sarah!
What's Popular

30-Minute Meals!
Join to receive our email series which contains a round-up of some of our quick and easy family favorite recipes.