
>>

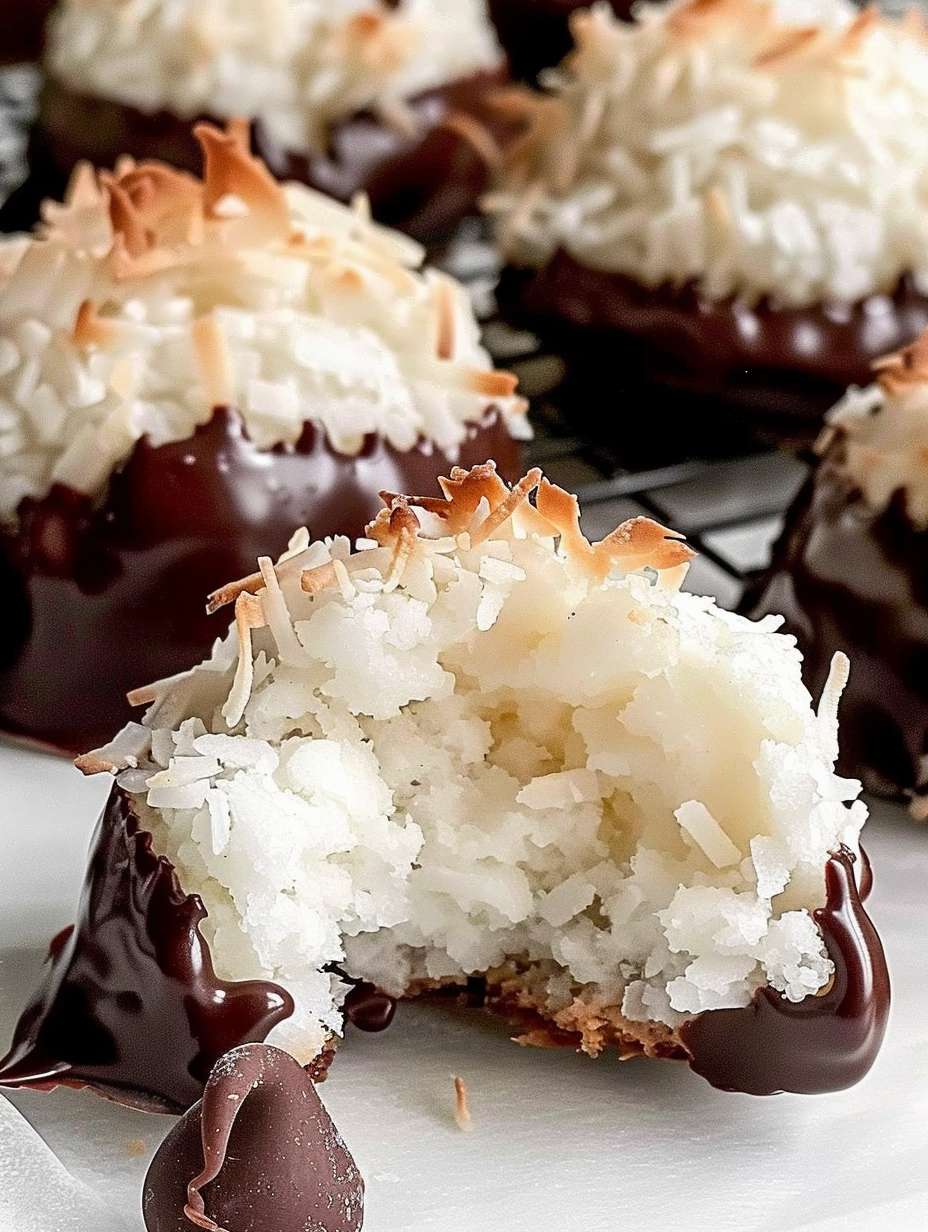
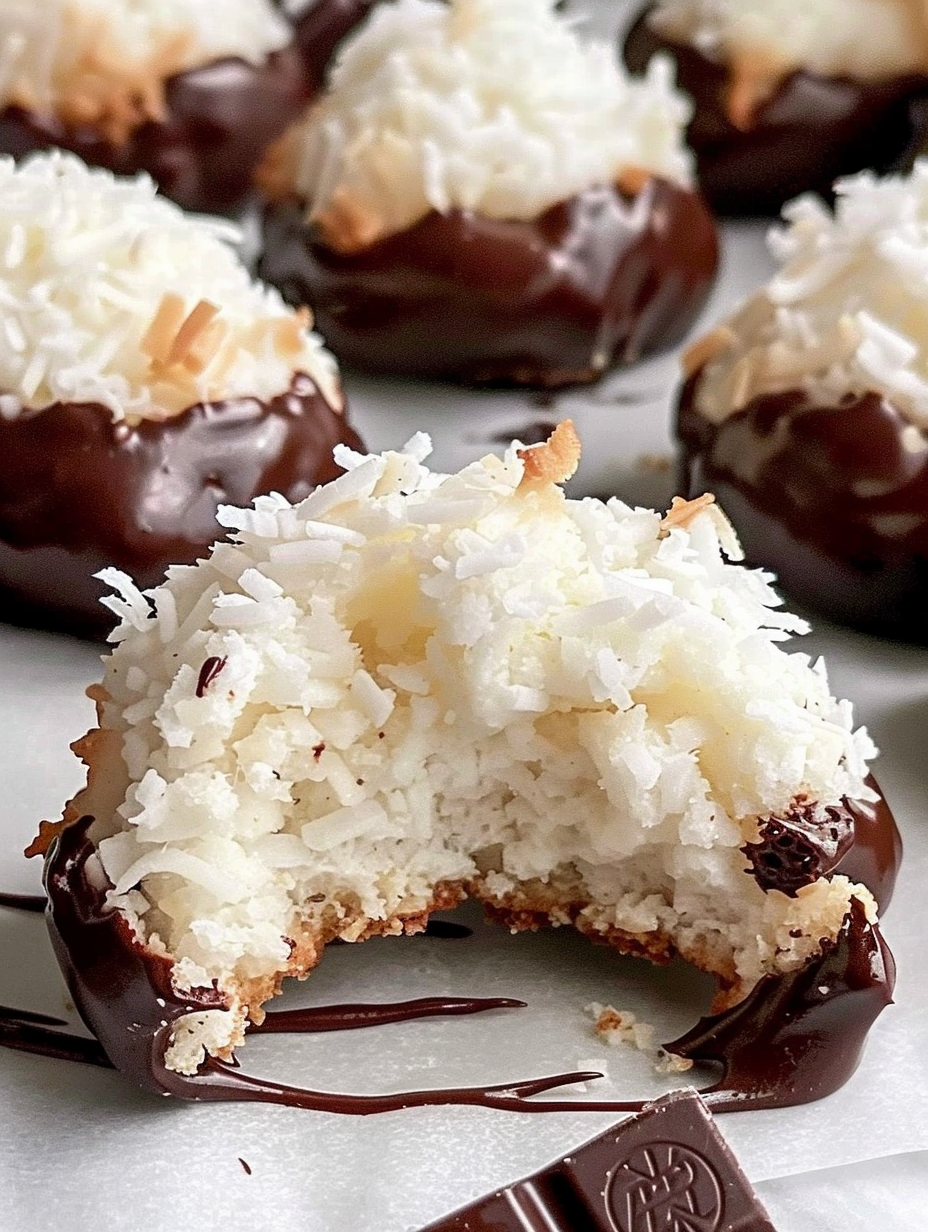
Light, chewy coconut macaroons made without condensed milk and naturally gluten free. These lower sugar cookies are quick to make and perfect for chocolate dipping.

This batch of coconut macaroons became my go to when I wanted a dessert that felt special but did not demand a lot of time or pantry rearranging. I discovered this formula on a busy holiday afternoon when I had a jar of unsweetened coconut, a few egg whites in the fridge, and zero condensed milk in my pantry. The result was surprisingly tender on the inside and gently toasted on the outside. These cookies have the crisped coconut chew I love with just enough sweetness to satisfy a craving. They are lower in sugar than many macaroon versions because they use plain granulated sugar and unsweetened coconut. Family and friends repeatedly asked for the recipe after tasting them warm from the oven.
I make them year round, but they always feel extra appropriate during celebrations and potlucks where people are looking for gluten free options. The texture is the most memorable part. The outside browns and becomes slightly crisp, while the center stays moist and coconut forward. If you want a touch of indulgence, dipping the bottoms in melted chocolate is an easy finishing move. That choice makes them feel decadent without much fuss. The method is forgiving which makes it friendly for cooks of all levels. These cookies also travel well which makes them perfect for gifting or bringing to gatherings.
My family reacts the same way every time I make these. The kids want the chocolate dipped ones first. An aunt who usually avoids coconut because she expects dry cookies admitted after tasting one that she was surprised by how moist and tender the center is. Over the years I have tweaked the resting time and the scoop size to make these consistent each bake which I share below as small technique notes.
My favorite part is how adaptable these are. I often keep the batter chilled for a day and bake fresh as needed which makes entertaining much easier. The recipe reliably produces 24 cookies when using a tablespoon scoop and makes a great make ahead treat for holiday boxes. Each time I serve them someone asks for the recipe because they are both nostalgic and lighter than traditional condensed milk versions.
Store cooled cookies in an airtight container in the refrigerator for up to one week. Place a sheet of parchment between layers to prevent sticking when chocolate is used. For longer storage freeze in a sealed freezer safe container for up to six months. Thaw in the refrigerator overnight and bring to room temperature before serving. If you need to transport them keep them in a single layer to avoid chocolate smears and pack gently. Recrisp briefly in a 300 degree Fahrenheit oven for five minutes if the exterior softened from refrigeration.
If you need a lower sugar version try a baking style granular sweetener measured one to one with the sugar. Use cornstarch instead of potato starch if that is what you have; texture will be very similar. For a dairy free finish select vegan chocolate. To make these nut free ensure your chocolate and coconut are processed in nut free facilities if allergies are a concern. For a deeper flavor swap half the vanilla for a tablespoon of almond extract if there are no nut allergies.
Serve warm with coffee or chilled with a glass of cold milk. Chocolate dipped bottoms pair beautifully with espresso. Dress them up for a party by arranging on a platter with fresh berries and mint sprigs. They also fit into a holiday cookie assortment and make a nice addition to a dessert board with other small sweets. For a tea service offer lemon curd on the side which complements the coconut flavor.
Macaroons have a long tradition as a simple coconut based cookie that is naturally gluten free. While they share a name with the French macaron these coconut macaroons have different origins tied to rustic coastal baking where coconut was abundant. Over time many regions adapted them to include condensed milk or egg yolk variations. This version keeps the focus on toasted coconut and a clean flavor profile that celebrates simple technique rather than complicated steps.
Make them festive by adding a teaspoon of finely grated citrus zest in spring or summer. For colder months add a pinch of ground cinnamon and nutmeg to the mixture. You can fold in a few chopped dried cherries or cranberries in fall for a tart contrast. Swapping semisweet chocolate for dark chocolate with 70 percent cocoa creates a richer winter treat.
Double the batch and keep half frozen for quick dessert emergencies. Portion on baking sheets and freeze the raw mounds on tray then transfer to a bag for later baking to preserve freshness. Baked cookies also freeze well. Label containers with date and whether chocolate was used. For grab and go breakfasts pack one or two in snack boxes with fruit and nuts for a quick sweet component.
These macaroons have earned a permanent place in my weeknight and holiday rotation. They are efficient, dependable, and always bring compliments. Try one warm with a cold drink and you will see why I keep this recipe on hand.
Use room temperature egg whites for easier incorporation and more consistent texture.
Let the mixture rest five minutes before scooping to hydrate the coconut and improve shaping.
Remove from oven when tops show light golden bits and bottoms are just brown to keep centers moist.
If dipping in chocolate, cool the cookies completely first to avoid melting the coating.
Freeze on a tray first to maintain shape, then transfer to a sealed container for long term storage.
This nourishing quick & easy coconut macaroons recipe is sure to be a staple in your kitchen. Enjoy every moist, high protein slice — it is perfect for breakfast or as a wholesome snack any time.
Yes. Store in an airtight container in the refrigerator for up to one week or freeze up to six months. Thaw in the refrigerator before serving.
Yes. Use dairy free chocolate for coating to keep the finished cookie dairy free.
They will not spread so you can place them close together on the baking sheet. Bake time remains 12 to 15 minutes.
This Quick & Easy Coconut Macaroons recipe makes perfectly juicy, tender, and flavorful steak every time! Serve with potatoes and a side salad for an unforgettable dinner in under 30 minutes.
Heat oven to 350 degrees Fahrenheit and line a large baking sheet with silicone liner or parchment paper.
Combine coconut, sugar, and starch, then add egg whites and vanilla. Mix one minute in a stand mixer with paddle attachment or beat with a hand mixer until evenly moistened.
Let the bowl sit for five minutes to hydrate the coconut which helps with shaping and texture.
Use a tablespoon cookie scoop to portion dough about one inch apart. Wet your fingers and smooth into neat mounds without stray pieces.
Bake for 12 to 15 minutes until bottoms are lightly browned and tops show some golden color. Remove earlier for chewier centers.
Cool on the pan five minutes then transfer to a wire rack. For chocolate coating melt chocolate and dip the bottoms, then refrigerate 15 to 30 minutes to set.
Last Step: Please leave a rating and comment letting us know how you liked this recipe! This helps our business to thrive and continue providing free, high-quality recipes for you.
Leave a comment & rating below or tag
@feastinarecipe on social media!

Cozy, bright, and ready fast, this Instant Pot lemon chicken orzo soup brings tender chicken, fresh veggies, and a sunny citrus finish.

Feather-light mini cheesecakes with bright strawberry sauce, a tender biscuit-style base, and creamy filling. Just 47 calories each and irresistibly fresh.

Silky mini cheesecakes swirled with melted chocolate and a splash of Kahlua, nestled on Oreo crusts and crowned with fresh whipped cream.
Leave a comment & rating below or tag @feastinarecipe on social media!
Enjoyed this recipe? Share it with friends and family, and don't forget to leave a review!
This recipe looks amazing! Can't wait to try it.
Comments are stored locally in your browser. Server comments are displayed alongside your local comments.

Join to receive our email series which contains a round-up of some of our quick and easy family favorite recipes.
