
Old School Sprinkle Sponge Tray Bake

A nostalgic vanilla traybake topped with simple icing and rainbow sprinkles — an easy, reliable pudding from school dinners that’s quick to make and perfect for slicing and sharing.

Why You'll Love This Recipe
- This tray bake is made from pantry staples and comes together in about 35 minutes from start to finish — perfect for last-minute gatherings and school lunchboxes.
- The method uses an all-in-one approach and a single bowl for minimal washing up, yet delivers a light, moist texture similar to classic canteen sponge.
- It slices neatly into 16 portions for sharing, and you can scale it up for larger tins or halve it for a smaller crowd without fuss.
- The icing sets quickly and keeps the cake soft at room temperature; no refrigeration required, which is handy for parties and buffets.
- It’s very adaptable: swap margarine for butter, use dairy-free spread for a dairy-free version, or add cocoa for a chocolate twist.
- Because the batter is straightforward, it’s a great recipe to make with kids — they can crack the eggs, stir the batter, and scatter the sprinkles.
I’ve taken this cake to school fêtes, family picnics, and church teas; every time it sparks the same happy conversation about childhood puddings. My sister always asks for the corner pieces, and my neighbour insists on extra sprinkles. The ease and consistency of the bake mean I rarely skip it when I want a quick crowd-pleaser that evokes comfort and nostalgia.
Ingredients
- Self-rising flour: Use 2 cups of self-rising flour for the lightest sponge — I prefer King Arthur or a trusted supermarket self-raising variety. If you only have plain flour, add 3 teaspoons baking powder and a pinch of salt per 2 cups.
- Superfine (caster) sugar: 1 1/4 cups of caster or superfine sugar dissolves quickly into the creamed margarine and gives a fine crumb; if you only have granulated sugar, pulse it briefly in a blender for a finer texture.
- Margarine at room temperature: Use about 1 cup plus 1 1/2 tablespoons of margarine (or butter) softened but not melted — this traps air when creamed and leads to a tender crumb.
- Eggs: 4 large eggs at room temperature help create structure and lift; warming them slightly speeds emulsification and prevents curdling when mixed into the fat.
- Vanilla extract: 1 teaspoon of pure vanilla brings warmth and depth; an inexpensive extract is fine, but pure vanilla gives a slightly richer aroma.
- Milk (optional): 1 tablespoon of whole milk loosens the batter just enough for a softer crumb — leave it out for a denser texture or use a plant milk for a dairy-free option.
- Icing sugar: For the glaze, use about 1 2/3 cups of powdered sugar mixed with 7 tablespoons of warm water to reach a pourable but slightly thick consistency.
- Hundreds and thousands (sprinkles): A generous handful to finish — they add nostalgia and a playful crunch.
Instructions
Preheat and prepare: Heat the oven to 350°F (180°C) conventional, 320°F (160°C) fan, or gas mark 4. Line a 9x13-inch (approx 23x33 cm) rectangular baking tin with parchment, ensuring the paper sits up the sides so you can lift the cake out easily. Preparing the tin ahead keeps the bake even and the edges neat. Cream margarine and sugar: In a large bowl, beat the softened margarine with the caster sugar until the mixture turns pale and fluffy — about 3 to 5 minutes with an electric hand mixer or 6 to 8 minutes by hand. This step incorporates air that helps the traybake rise and builds the cake’s light texture. Add eggs: Add the eggs one at a time, beating after each addition until incorporated. If the mixture looks a little curdled after an egg, add a tablespoon of flour or a dash of the milk to bring it back together; beating thoroughly will emulsify the batter. Fold in flour and flavor: Sift the self-rising flour and fold it into the batter in two or three additions using a large metal spoon or spatula. Fold gently to keep as much air as possible. Stir in the vanilla and, if using, the tablespoon of milk to reach a smooth, dropping consistency that will level in the tin. Bake: Pour the batter into the prepared tin, smoothing the surface with a spatula. Bake for 25 to 30 minutes or until a skewer inserted into the centre comes out clean or with a few moist crumbs. Depending on your oven and the exact tin size, the time can vary — start checking at 22 minutes. Cool and glaze: Allow the cake to cool completely in the tin on a wire rack. For the icing, whisk the powdered sugar with warm water until smooth and pourable; pour it over the cooled cake, spread to the edges, and immediately scatter the sprinkles. Leave the glaze to set at room temperature for at least 30 minutes before slicing.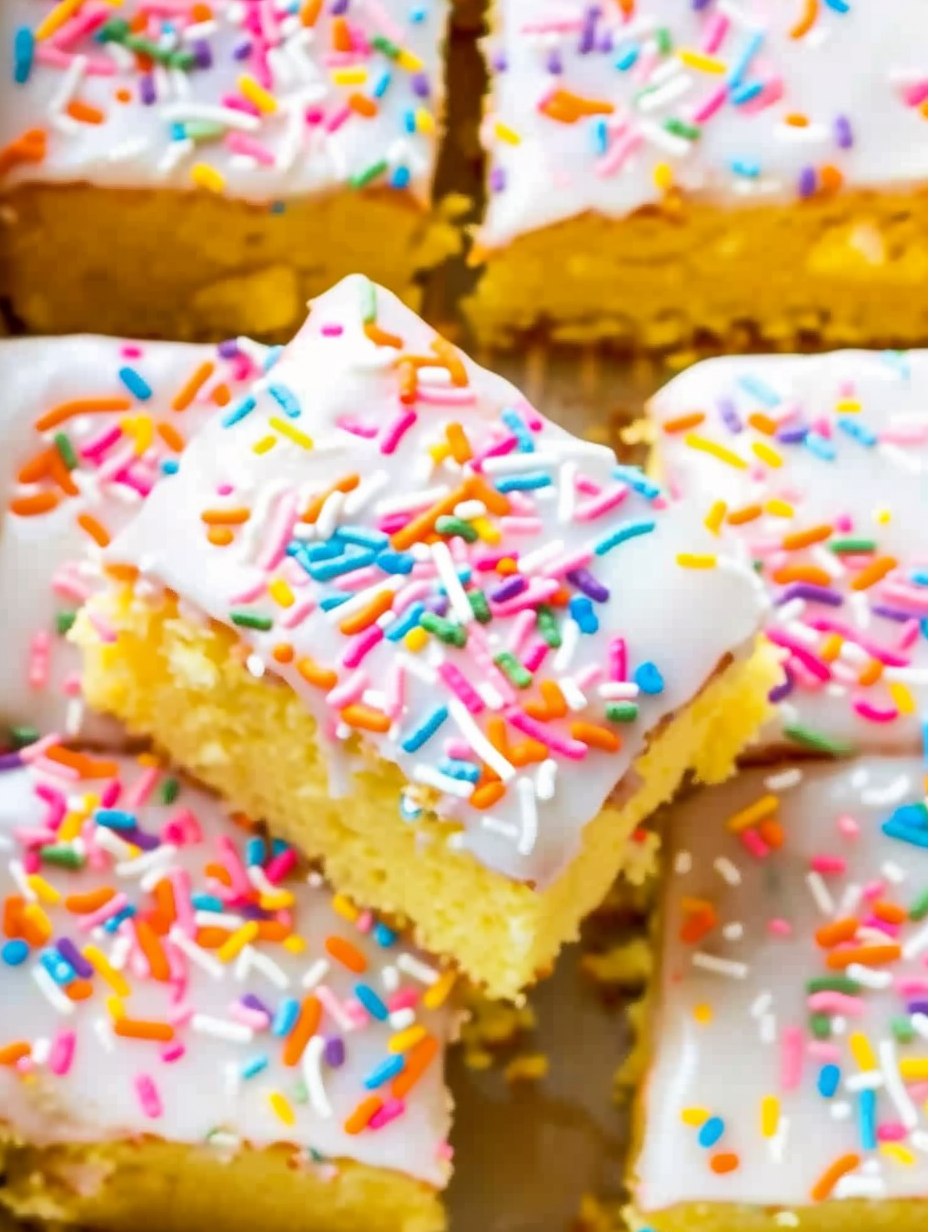
You Must Know
- This traybake keeps well at room temperature in an airtight container for up to 5 days — refrigeration dries it out quickly.
- It freezes well: slice into portions, wrap tightly, and freeze for up to 3 months; thaw at room temperature before serving.
- Use room-temperature eggs and margarine for best emulsification and texture; cold ingredients can lead to a denser result.
- Don’t over-ice while the cake is warm: the glaze should set on a fully cooled surface to prevent it soaking completely into the crumb.
- If using plain flour, add 3 teaspoons baking powder and a pinch of salt to mimic self-rising flour.
What I love most is how forgiving this method is: the batter is forgiving of minor measurement shifts, and even if the oven runs slightly unevenly, the cake stays moist. Every time I bring a tin to a gathering, someone will comment that it tastes just like school dinners — that reaction never gets old and often sparks a whole conversation about favourite childhood puddings.

Storage Tips
Store the tray bake at room temperature in an airtight container or cover the tin tightly with cling film; refrigeration will dry the cake. For short-term storage, keep it on the counter away from direct sunlight and heat sources — the icing stays stable at room temperature. To freeze, cut into squares, wrap each piece in cling film, and place in a freezer-safe bag or container for up to 3 months. To reheat from frozen, unwrap and warm gently in a low oven (300°F / 150°C) for 8 to 12 minutes or let it come to room temperature; avoid microwaving frozen squares as the texture can become gummy.
Ingredient Substitutions
If you don’t have self-rising flour, use 2 cups all-purpose flour plus 3 teaspoons baking powder and 1/4 teaspoon salt. Swap margarine for an equal amount of unsalted butter for a richer flavour; if using salted butter, reduce any additional salt. For a dairy-free version, use a dairy-free spread labeled for baking and a plant-based milk such as soy or oat in place of regular milk. To make this chocolate, substitute 1/4 cup of the flour with unsweetened cocoa powder and add an extra tablespoon of milk to keep the batter moist. These changes will alter the crumb slightly but maintain the tray bake’s nostalgic character.
Serving Suggestions
Serve slices at tea time with hot cups of tea or coffee, or pack them in lunchboxes for a sweet treat. For a retro presentation, cut into neat squares and place on a cake stand or bake on a doily-lined platter. Garnish with a dusting of additional sprinkles or a few edible glitter stars for parties. Pair with fresh berries and whipped cream for a slightly lighter contrast, or serve alongside a scoop of vanilla ice cream to turn the pudding into an indulgent dessert. The bright sprinkles make the cake feel festive at birthdays and school events.
Cultural Background
This simple sponge tray bake has roots in British school dining halls and home baking traditions throughout the mid-20th century. The pared-back ingredients reflect a time when rationing and thrift influenced cooking; yet cooks turned modest supplies into comforting puddings by focusing on technique. The thin icing and colourful sprinkles became emblematic of affordable celebration cakes served at children’s parties and community gatherings. Over time, the traybake migrated from institutional settings into home kitchens as a nostalgic treat, cherished for its simplicity and the memories it conjures of communal meals and school-day routines.
Seasonal Adaptations
In spring, top the iced surface with candied edible flowers or a scattering of fresh lemon zest for brightness. For autumn, fold a teaspoon of ground cinnamon and a pinch of nutmeg into the batter and use maple-flavoured icing instead of plain water-thinned icing. In winter, swap sprinkles for crushed peppermint or a drizzle of chocolate ganache warmed slightly before setting. On summer picnic days, cut slices into bite-sized squares and serve chilled on a platter — the cake still holds together well and is refreshing when paired with cold drinks.
Meal Prep Tips
Make the sponge up to two days ahead and store it at room temperature; add the icing and sprinkles on the day you plan to serve to keep the topping bright and the sprinkles from bleeding colour into the glaze. For busy weeks, bake and freeze pre-cut portions; wrap tightly and label with the date. If you plan to transport the cake, store it in a low-profile cake carrier to prevent the icing from smudging. When cutting neat slices, chill the cake briefly so the icing firms up, then use a warm, dry knife for clean edges.
There’s something endlessly comforting about this old-school tray bake — it’s an easy, reliable piece of nostalgia that feeds a crowd and sparks memories. Give it a try, make it your own with small swaps, and don’t skimp on the sprinkles — they’re half the fun.
Pro Tips
Use room-temperature eggs and margarine for smoother emulsification and a lighter texture.
If the batter looks curdled after adding an egg, stir in a tablespoon of flour or milk before continuing.
Allow the cake to cool completely before glazing so the icing sets on the surface rather than soaking in.
If using granulated sugar instead of caster, pulse briefly in a blender for a finer texture.
This nourishing old school sprinkle sponge tray bake recipe is sure to be a staple in your kitchen. Enjoy every moist, high protein slice — it is perfect for breakfast or as a wholesome snack any time.
FAQs about Recipes
Can I freeze this cake?
Yes. Once cooled completely, wrap individual slices tightly in plastic wrap and freeze for up to 3 months. Thaw at room temperature before serving.
How do I know when the cake is baked?
Insert a skewer into the thickest part of the cake; if it comes out clean or with a few moist crumbs, it is cooked.
Tags
Old School Sprinkle Sponge Tray Bake
This Old School Sprinkle Sponge Tray Bake recipe makes perfectly juicy, tender, and flavorful steak every time! Serve with potatoes and a side salad for an unforgettable dinner in under 30 minutes.
Ingredients
School Cake
Icing
Instructions
Preheat and prepare the tin
Preheat the oven to 350°F (180°C) conventional or 320°F (160°C) fan. Line a 9x13 inch (23x33 cm) baking tin with parchment paper, leaving a little overhang to lift the cake out easily.
Cream margarine and sugar
Beat the softened margarine with the caster sugar until pale and fluffy, about 3 to 5 minutes with an electric mixer. Proper creaming traps air and helps create a light texture.
Add the eggs
Add the eggs one at a time, mixing well after each addition. If the mixture looks curdled, add a tablespoon of flour or milk to re-emulsify before the next egg.
Fold in flour and flavouring
Sift the self-rising flour and fold it into the batter in two or three additions using a spatula. Stir in the vanilla and the optional tablespoon of milk until the batter is smooth and dropping consistency.
Bake the traybake
Pour the batter into the prepared tin and smooth the top. Bake for 25 to 30 minutes until a skewer inserted into the centre comes out clean or with a few moist crumbs. Start checking at 22 minutes depending on oven variance.
Cool and ice
Cool the cake completely on a wire rack. Whisk the powdered sugar with warm water to a pourable icing, pour over the cooled cake, spread evenly, and immediately scatter the sprinkles. Allow icing to set before slicing.
Last Step: Please leave a rating and comment letting us know how you liked this recipe! This helps our business to thrive and continue providing free, high-quality recipes for you.
Nutrition
Did You Make This?
Leave a comment & rating below or tag
@feastinarecipe on social media!
Categories:
You might also like...

Lemon Chicken Orzo Soup
Cozy, bright, and ready fast, this Instant Pot lemon chicken orzo soup brings tender chicken, fresh veggies, and a sunny citrus finish.

50 Calorie Strawberry Cheesecakes
Feather-light mini cheesecakes with bright strawberry sauce, a tender biscuit-style base, and creamy filling. Just 47 calories each and irresistibly fresh.

Kahlua Chocolate Cheesecake Bites
Silky mini cheesecakes swirled with melted chocolate and a splash of Kahlua, nestled on Oreo crusts and crowned with fresh whipped cream.
Did You Make This?
Leave a comment & rating below or tag @feastinarecipe on social media!
Rate This Recipe
Share This Recipe
Enjoyed this recipe? Share it with friends and family, and don't forget to leave a review!
Comments (1)
This recipe looks amazing! Can't wait to try it.
Comments are stored locally in your browser. Server comments are displayed alongside your local comments.

Hi, I'm Sarah!
What's Popular

30-Minute Meals!
Join to receive our email series which contains a round-up of some of our quick and easy family favorite recipes.