
>>

Quick, cheesy mini pepper pizzas made with sweet peppers, melty mozzarella, and mini pepperoni—perfect for parties, snacks, and family gatherings.
This recipe for Mini Pepper Pizzas has been my go-to when I want something fast, flavorful, and crowd-pleasing. I first discovered this combination one evening while trying to make a lighter, vegetable-first snack for a small gathering. The bright crunch of the sweet peppers combined with warm, gooey mozzarella and the salty snap of mini pepperoni instantly won everyone over. It’s the sort of recipe that you can assemble in minutes and serve warm from the oven, and it always disappears faster than I expect.
I love how the peppers act as both vessel and flavorful component: they add a fresh, slightly sweet contrast to the savory pizza toppings and keep the snack naturally gluten-free. Because the peppers stay crisp at the edges while the cheese bubbles, you get an enjoyable mix of textures. This little recipe has become a staple at potlucks, a frequent halftime snack during game nights, and a simple weeknight solution when I want something that feels indulgent but is light enough to not weigh us down.
When I first served these to my family, my youngest, who is notoriously picky, declared them "real pizza" and asked for seconds. That moment sealed this as a repeat favorite; it’s the kind of win that turns a tiny experiment into a permanent recipe in the weeknight rotation.
My favorite part is how adaptable these are—I've served them at summer cookouts, packed them in lunchboxes, and even used them as a quick appetizer for casual dinner parties. Each time someone discovers how much flavor a little pepper can deliver, they ask for the recipe. It’s simple cooking that still creates a "wow" moment.
Store cooled leftovers in a single layer if possible to avoid soggy bottoms; use parchment-lined shallow containers with paper towels between layers to absorb excess moisture. Refrigerate for up to 3 days. For longer storage, place assembled but unbaked halves on a tray and freeze until set, then transfer to a freezer bag for up to 3 months. Reheat from frozen in a 375°F oven for 10–12 minutes or until cheese bubbles. Avoid microwaving for reheating if you want to preserve the pepper’s crisp edges; the oven will restore texture better.
If you need a vegetarian version, replace pepperoni with thinly sliced mushrooms, small artichoke hearts, or sundried tomatoes; add a sprinkling of grated Parmesan for savory depth. Swap mozzarella for dairy-free shreds to make them dairy-free—note that melt and flavor will vary with brand. For a spicier variation, use chorizo slices or spicy salami, and for a fresher finish, add torn basil leaves and a squeeze of lemon after baking.
Arrange these on a large platter with toothpicks for easy picking at parties. Pair with a crisp green salad or a grain salad for a light meal. For dipping, provide a small bowl of warmed pizza sauce or ranch dressing. Garnish with flaked sea salt and freshly cracked black pepper or a light drizzle of herb oil. They work equally well as an appetizer or as part of a tapas-style spread alongside marinated olives and roasted nuts.
While not a traditional cultural dish, this idea riffs on classic Italian-American flavors—tomato sauce, mozzarella, and cured meat—presented in a vegetable-forward, finger-food format inspired by modern appetizer trends. Mini stuffed peppers have long been a party staple in many cuisines; adding pizza toppings is a playful American adaptation that merges convenience with beloved pizza flavor profiles.
In summer, choose the crispiest local mini peppers and top with fresh basil and ripe heirloom cherry tomatoes for brightness. In colder months, swap in roasted squash cubes or caramelized onions for a heartier filling. Holiday gatherings call for festive toppings like prosciutto and fig jam or a sprinkle of toasted pine nuts for texture and a seasonal twist.
For fast assembly during busy weeks, halve and clean the peppers ahead and store them airtight in the fridge for up to 24 hours. Grate mozzarella in advance and portion sauce into a squeeze bottle for neat, even distribution. Pre-assembled peppers can be kept covered and baked straight from the fridge, shaving off precious minutes when hungry guests arrive.
These mini pepper pizzas are a small recipe with a big personality—easy to make, flexible, and consistently loved. Give them a try at your next gathering and enjoy how quickly they become a favorite.
Use larger mini sweet peppers for easier stuffing and a more generous bite.
Shred mozzarella from a block for the best melt and texture—pre-shredded cheese contains anti-caking agents that affect melting.
Check oven at 8 minutes; cheese should be bubbly and slightly golden to avoid over-browning.
This nourishing mini pepper pizzas recipe is sure to be a staple in your kitchen. Enjoy every moist, high protein slice — it is perfect for breakfast or as a wholesome snack any time.
Yes. To keep them gluten-free, verify your pizza sauce and pepperoni are labeled gluten-free.
Yes. Assemble and freeze on a tray, then transfer to a bag for up to 3 months. Bake from frozen, adding a few extra minutes.
This Mini Pepper Pizzas recipe makes perfectly juicy, tender, and flavorful steak every time! Serve with potatoes and a side salad for an unforgettable dinner in under 30 minutes.
Preheat the oven to 425°F. Line a baking sheet with parchment paper and place a rack in the middle position for even heat circulation.
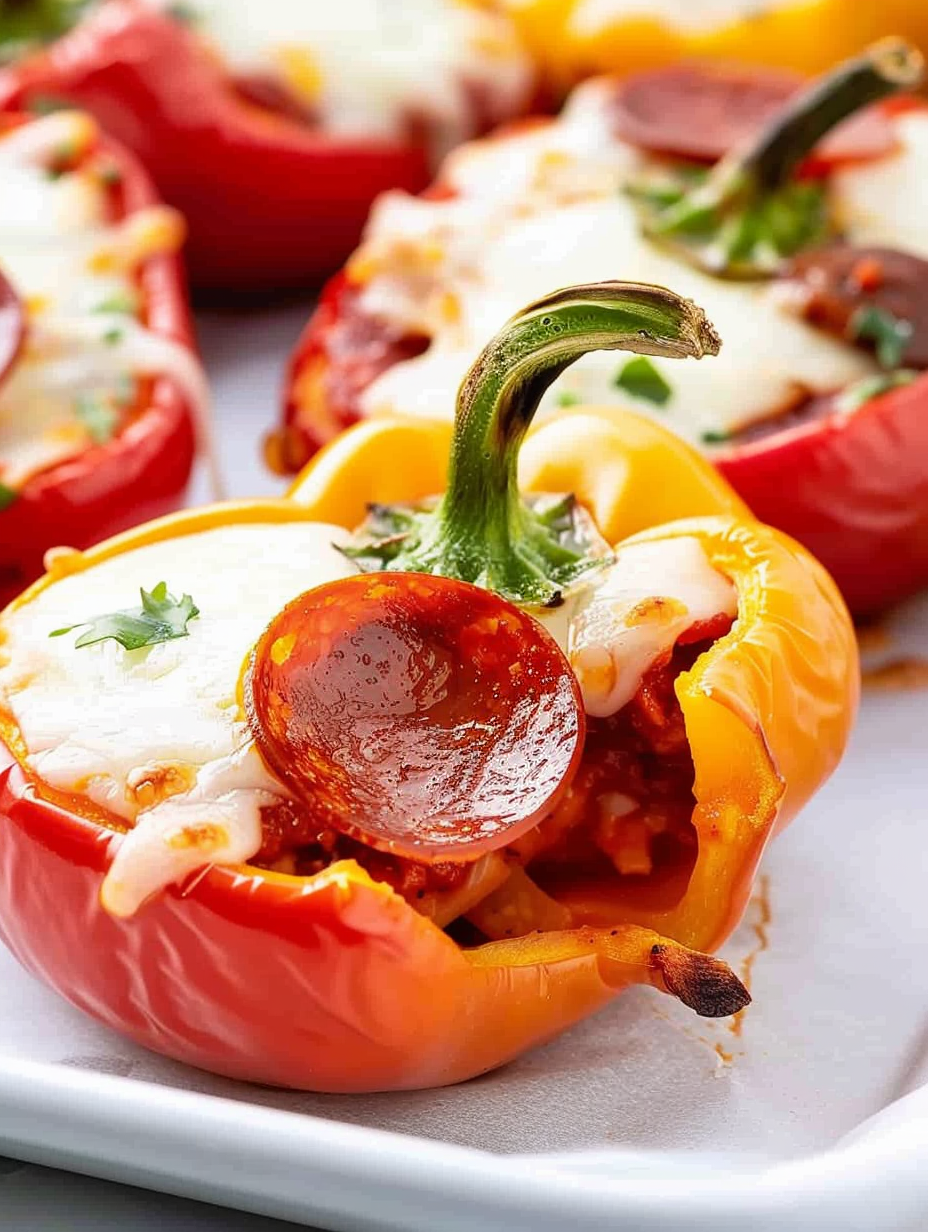
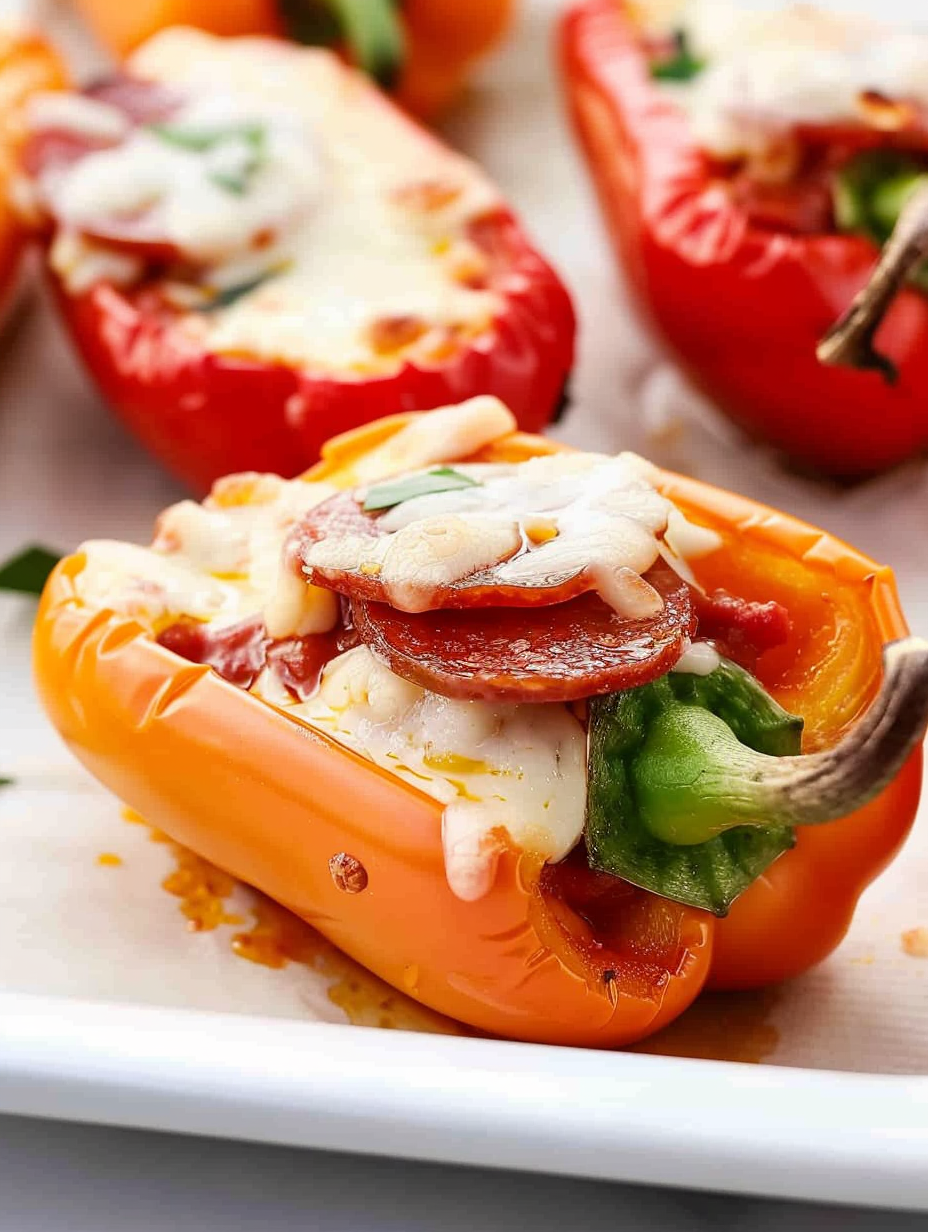
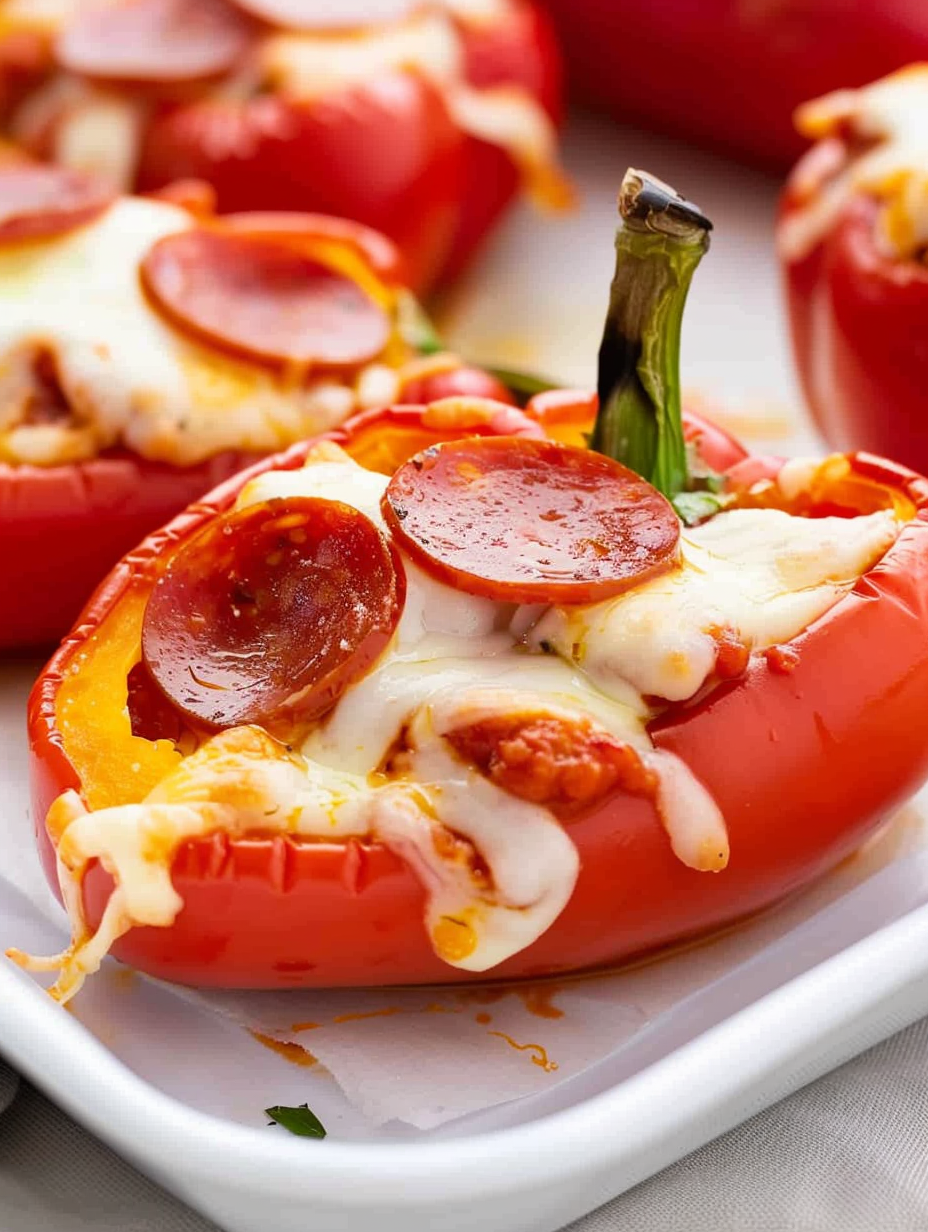
Slice each mini pepper lengthwise, keeping the stem intact for presentation. Remove seeds and membranes carefully so the halves remain intact and can hold toppings.
Spoon 1½ teaspoons to ½ tablespoon of pizza sauce into each pepper half depending on size. Top with 1½ to 2 tablespoons of shredded mozzarella so the cheese creates a melty layer.
Top each half with 3–4 mini pepperoni slices pressed gently into the cheese. Bake at 425°F for 8–10 minutes until cheese is bubbly and lightly golden.
Allow the baked peppers to rest 1–2 minutes so the cheese sets slightly. Serve warm with optional fresh basil or a drizzle of olive oil.
Last Step: Please leave a rating and comment letting us know how you liked this recipe! This helps our business to thrive and continue providing free, high-quality recipes for you.
Leave a comment & rating below or tag
@feastinarecipe on social media!

Cozy, bright, and ready fast, this Instant Pot lemon chicken orzo soup brings tender chicken, fresh veggies, and a sunny citrus finish.

Feather-light mini cheesecakes with bright strawberry sauce, a tender biscuit-style base, and creamy filling. Just 47 calories each and irresistibly fresh.

Silky mini cheesecakes swirled with melted chocolate and a splash of Kahlua, nestled on Oreo crusts and crowned with fresh whipped cream.
Leave a comment & rating below or tag @feastinarecipe on social media!
Enjoyed this recipe? Share it with friends and family, and don't forget to leave a review!
This recipe looks amazing! Can't wait to try it.
Comments are stored locally in your browser. Server comments are displayed alongside your local comments.

Join to receive our email series which contains a round-up of some of our quick and easy family favorite recipes.
