
>>

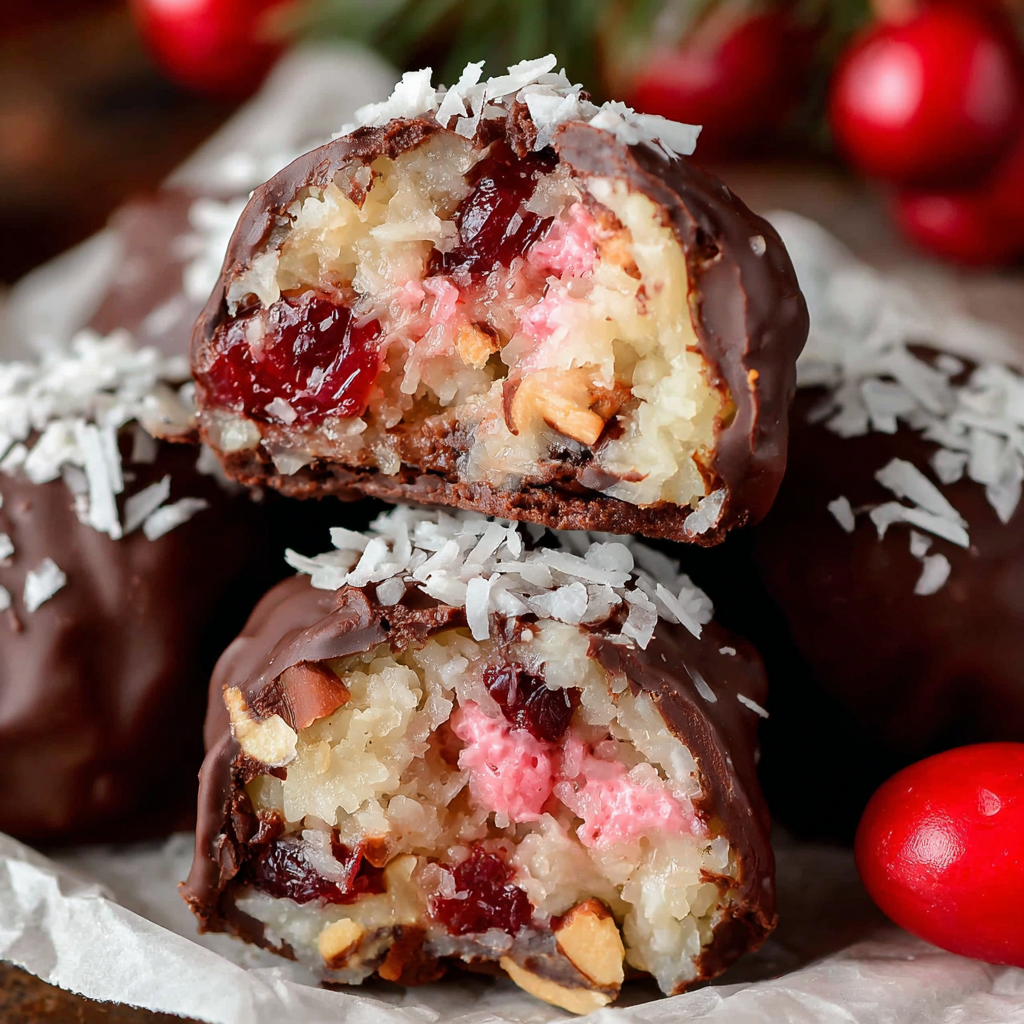
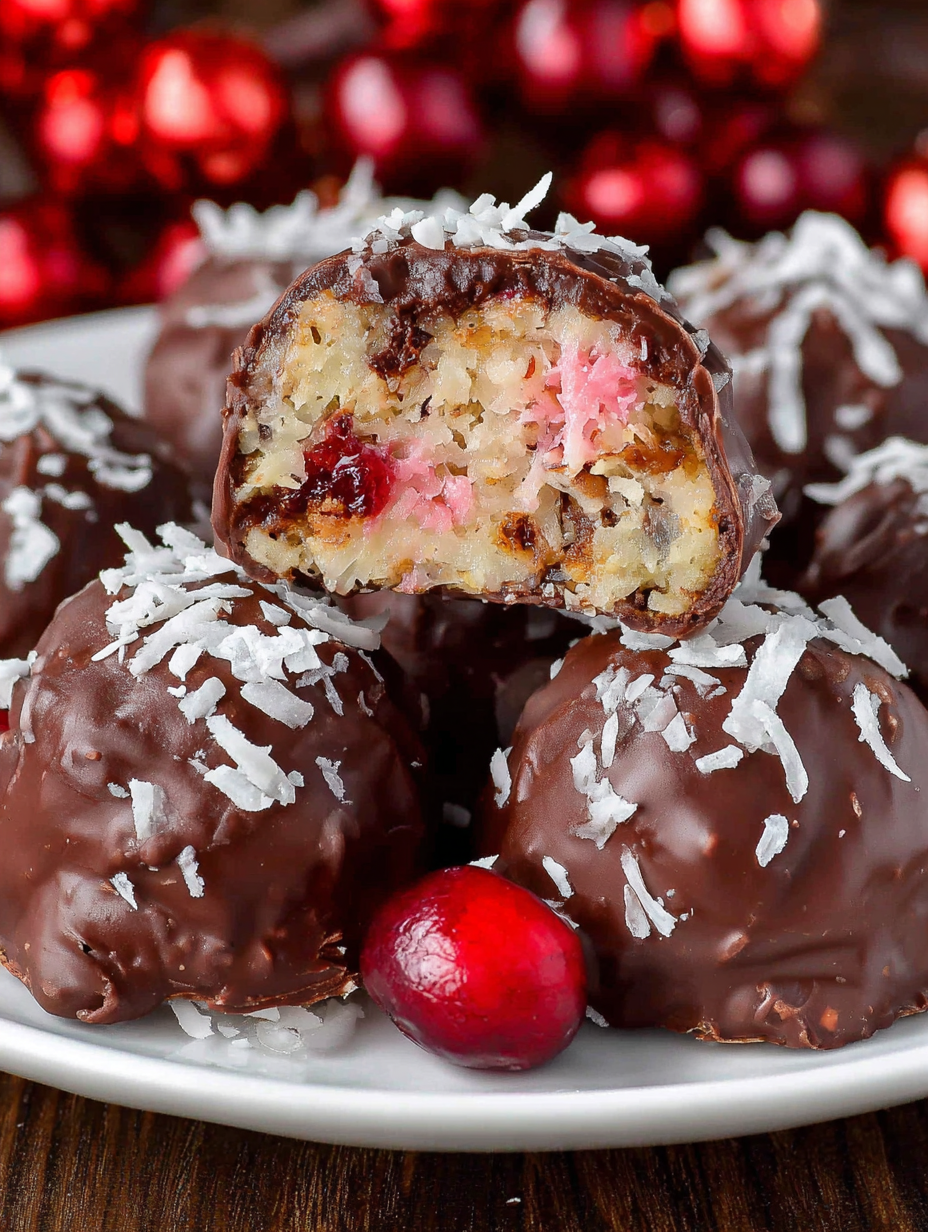
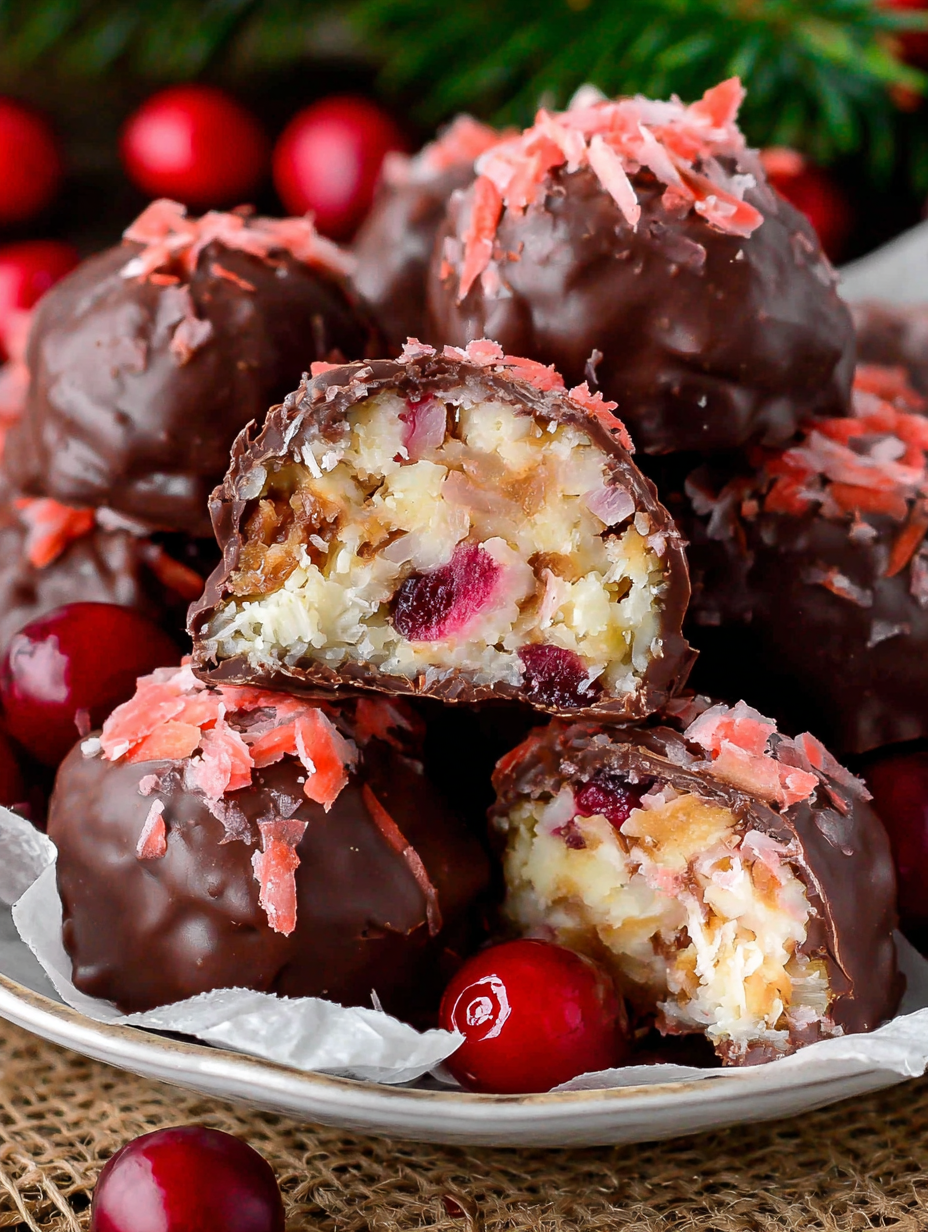
Old-fashioned Martha Washington candies filled with coconut, pecans, and cherries, hand-dipped in chocolate — perfect for holiday trays and gift-giving.
I’ve made these for neighborhood cookie swaps, school fundraisers, and quiet evenings with cocoa. My family always jokes that the plate is empty within a day — they’re small, rich, and dangerously easy to keep eating. The first time I packaged a dozen for a neighbor, she called within hours to ask for the recipe; I didn’t have the heart to say it was the same one my grandmother used.
My favorite part is the moment I lift the first dipped piece from the tray and see the glossy shell—there’s an instant sense of accomplishment. These candies have been the centerpiece of many family gatherings; one year I packaged them in simple kraft boxes and handed them to neighbors. The feedback? “Best candy I’ve had in years.” That kind of reaction never grows old and is why I make them every season.
Store the candies in a single layer or separated by parchment paper in an airtight container at room temperature; avoid placing them near direct heat or sunlight which can soften the coating. If you need to stack layers, place parchment or wax paper between rows to prevent sticking. For longer-term storage, flash-freeze the uncoated centers on a baking sheet, then transfer to a freezer-safe container. When ready to serve, dip from frozen and allow the coating to set; this helps maintain a firmer interior. Thaw dipped candies slowly in the refrigerator to avoid condensation on the chocolate.
If you need to adjust ingredients, here are reliable swaps: replace pecans with chopped walnuts or pistachios for a different nutty profile. For a nut-free version, use toasted sunflower seeds or crispy rice cereal—expect less richness and a different texture. To reduce sweetness, substitute half the sweetened shredded coconut with unsweetened and reduce powdered sugar slightly; however, be aware the centers may be drier. If avoiding dairy, use dairy-free butter and a vegan condensed milk alternative, but note that texture and flavor will shift. For a darker chocolate finish, use 70% couverture and temper for a professional snap.
These candies shine on holiday cookie trays alongside shortbread and fudge. Garnish trays with holly sprigs or edible gold dust for a festive touch. They pair wonderfully with a small cup of espresso or a glass of sweet dessert wine. For gift boxes, place in mini paper liners and tuck into small kraft boxes with a ribbon. On a cheese board, include them as the sweet element to balance cheeses and savory crackers.
Martha Washington candies are named after an old-fashioned candy style popularized generations ago in American holiday baking. They reflect a tradition of preserving textures—chewy centers, crunchy nuts, and glossy chocolate—that became staples in mid-20th century confectionery. Many families have inherited slightly different versions, swapping nuts or fruit preserves, making it a charming example of culinary heritage evolving through home cooks.
In winter, add a pinch of ground cinnamon or orange zest to the filling for a warm holiday note. In summer, swap maraschino cherries for dried cranberries rehydrated briefly and chopped to avoid excess moisture. For Valentine’s Day twist, fold in a teaspoon of rosewater and top each dipped candy with a small edible heart sprinkle right after dipping so it adheres.
Make the filling up to two days ahead and keep chilled in a covered container. Form the centers and refrigerate them until ready to dip; this splits the work across days. For efficient production, set up an assembly line: bowl of melted coating, dipping tool, parchment-lined tray, and a cooling rack for excess drip. Work in small batches to maintain a steady temperature of the coating, reheating briefly if it cools and thickens.
These candies are a wonderful link to the past and a reliable crowd-pleaser. With a little planning—chilling, neat forming, and careful dipping—you’ll end up with an impressive tray that tastes homemade and timeless. Share them with friends, tuck a few into a holiday gift, and enjoy the smiles that follow.
Chill the filling thoroughly before forming balls to prevent sticky, misshapen centers.
Blot chopped maraschino cherries well to remove excess liquid and avoid soft filling.
Use a dipping tool or fork and tap off excess chocolate to reduce pooling at the base.
Toast pecans lightly for a deeper, nuttier flavor but allow them to cool before mixing.
This nourishing martha washington candies recipe is sure to be a staple in your kitchen. Enjoy every moist, high protein slice — it is perfect for breakfast or as a wholesome snack any time.
This Martha Washington Candies recipe makes perfectly juicy, tender, and flavorful steak every time! Serve with potatoes and a side salad for an unforgettable dinner in under 30 minutes.
Chop the maraschino cherries into very small pieces and blot on paper towels to remove excess liquid. Ensuring they are dry prevents a soggy filling.
In a large bowl, stir together melted butter, powdered sugar, vanilla, shredded coconut, sweetened condensed milk, chopped cherries, and chopped pecans until a uniform, sticky mixture forms.
Cover and refrigerate the mixture for at least two hours to firm up. Chilling hydrates the powdered sugar and stabilizes the fat so centers hold shape when rolled.
Scoop portions about 1 inch in size and roll into smooth balls. Place formed balls on a parchment-lined baking sheet and refrigerate for 20 minutes to re-firm.
Melt the candy coating according to package directions or gently warm chocolate with a teaspoon of oil for dipping. Keep the coating smooth and fluid for clean dipping.
Dip chilled centers into the coating, tap off excess, and place on parchment to set. Work in small batches and avoid pooling chocolate at the base.
Allow coating to fully set then store candies in an airtight container at room temperature for up to two weeks, or freeze for longer storage.
Last Step: Please leave a rating and comment letting us know how you liked this recipe! This helps our business to thrive and continue providing free, high-quality recipes for you.
Leave a comment & rating below or tag
@feastinarecipe on social media!

Cozy, bright, and ready fast, this Instant Pot lemon chicken orzo soup brings tender chicken, fresh veggies, and a sunny citrus finish.

Feather-light mini cheesecakes with bright strawberry sauce, a tender biscuit-style base, and creamy filling. Just 47 calories each and irresistibly fresh.

Silky mini cheesecakes swirled with melted chocolate and a splash of Kahlua, nestled on Oreo crusts and crowned with fresh whipped cream.
Leave a comment & rating below or tag @feastinarecipe on social media!
Enjoyed this recipe? Share it with friends and family, and don't forget to leave a review!
This recipe looks amazing! Can't wait to try it.
Comments are stored locally in your browser. Server comments are displayed alongside your local comments.

Join to receive our email series which contains a round-up of some of our quick and easy family favorite recipes.
