Chicken Stuffed Peppers Recipe - Easy Weeknight Dinner
30-MINUTE MEALS! Get the email series now
Feastina

Chicken Stuffed Peppers

5 from 1 vote
1 Comments
Sarah
By: SarahUpdated: May 2, 2026
This post may contain affiliate links. Please read our disclosure policy.

Easy, crowd-pleasing chicken stuffed peppers: seasoned ground chicken, salsa, rice, and melty Colby Jack baked until tender — a weeknight favorite.

Chicken Stuffed Peppers
This dish of stuffed bell peppers filled with seasoned ground chicken, bright salsa, and gooey Colby Jack has been a reliable family supper for years. I first developed this version on a busy weeknight when pantry staples and a bag of bell peppers demanded a flavorful finish. The result was an immediate hit: the peppers roast tender while the filling stays juicy, with the rice giving structure and the cheese adding a creamy finish. It’s the sort of meal that brings everyone to the table, warms the kitchen, and sends plates back for seconds. What I love most about these stuffed peppers is their balance of texture and simple, comforting flavors. The ground chicken stays moist when cooked correctly, the onions soften into sweetness, and salsa brings acidity and a subtle kick that ties everything together. This recipe is a great entry point for home cooks who want a straightforward, low-fuss main that still looks and tastes like you put in extra effort. It’s also forgiving: swap rice for cauliflower rice, use different cheeses, or change the salsa heat to suit your household.

Why You'll Love This Recipe

  • Ready in about 45 minutes from start to finish, making it ideal for busy weeknights when you want something satisfying without the fuss.
  • Uses pantry staples and one packet of taco seasoning plus jarred salsa, so you can assemble quickly with items you likely already have.
  • Each bell pepper half holds approximately 1/2 cup of filling, which makes portioning predictable and perfect for meal prep or serving guests.
  • Make-ahead friendly: fill the peppers in advance and refrigerate covered for up to 24 hours, then bake when you’re ready — great for planning dinners.
  • Customizable for different diets: substitute turkey or beef, swap in cooked quinoa for rice, or omit cheese for a lighter option.
  • Crowd-pleasing finish with melted Colby Jack that browns slightly under the broiler for an attractive presentation.

I remember the first time I plated these for friends — they admired the color of the roasted peppers, then kept saying how perfectly seasoned the filling was. My youngest, normally picky about vegetables, declared the peppers his favorite and went back for thirds. Over time I tuned the onion dice, the cooking time, and the water in the baking dish to ensure tender but not mushy peppers every single time.

Ingredients

  • Water: 1/2 cup. Added to the bottom of the baking dish to create steam so the peppers soften evenly; plain tap water is fine.
  • Bell peppers: 3 large, halved with stems, veins, and seeds removed. Choose firm peppers with glossy skins; red, yellow, or orange add sweetness and color. Green peppers work but are more bitter.
  • Olive oil: 2 tablespoons. Use a good-quality extra-virgin olive oil for flavor when sautéeing the chicken and onion.
  • Ground chicken: 1 pound. Look for lean but not overly dry (85 to 90% lean works well). Ground chicken soaks up seasoning and stays tender if not overcooked.
  • Yellow onion: 1/2 cup small diced. A small dice ensures the onion melts into the filling and distributes flavor evenly; sweet or yellow onion is recommended.
  • Salt and black pepper: 1/2 teaspoon salt and 1/4 teaspoon black pepper to season while cooking.
  • Chicken taco seasoning: 0.85 ounce packet. This packet adds the signature savory-spicy profile; if using homemade, use about 2 tablespoons of your blend.
  • Mild salsa: 1/2 cup jarred. Choose a brand you enjoy; mild keeps the filling kid-friendly while adding acidity and tomato notes.
  • Prepared white rice: 1 cup (Minute Rice or other cooked white rice). Rice binds the filling and stretches the mixture to feed more people.
  • Colby Jack cheese: 8 ounces shredded. This blend melts beautifully and gives a mild, creamy finish. Monterey Jack or cheddar may be used as alternatives.
  • Fresh parsley or cilantro: 1 tablespoon chopped, optional garnish. Adds brightness and a fresh herbal note at the end.

Instructions

Preheat and prepare dish: Preheat your oven to 375°F (190°C). Pour 1/2 cup water into the bottom of a 9x13-inch baking dish. This creates a steamy environment that helps the peppers become tender without drying out the filling. Set the dish aside while you prepare the filling. Prepare the peppers: Halve each bell pepper lengthwise and remove the stem, veins, and seeds, creating a neat hollow. Place the pepper halves cut-side up in a single layer in the prepared baking dish so they sit stable and ready to be filled. Sautée the aromatics and chicken: Heat 2 tablespoons olive oil in a large skillet over medium-high heat. When the oil shimmers, add 1 pound ground chicken and 1/2 cup small-diced yellow onion. Season with 1/2 teaspoon salt and 1/4 teaspoon black pepper. Cook for 5 to 6 minutes, breaking up the meat with a spatula, until no pink remains and the onion is translucent. Add seasoning and salsa: Stir in the 0.85-ounce packet of chicken taco seasoning and 1/2 cup mild salsa. Allow the mixture to bubble gently for 1 to 2 minutes so the flavors meld and some moisture evaporates, concentrating the taste. Incorporate rice and fill peppers: Turn off the heat and fold in 1 cup prepared white rice until evenly combined. Each pepper half will hold about 1/2 cup of filling; spoon the mixture into the peppers, dividing it evenly. Smooth the tops so the cheese will melt uniformly on each half. Top with cheese and bake: Top the filled peppers evenly with 8 ounces shredded Colby Jack. Tent the baking dish with aluminum foil (lightly sprayed with cooking spray on the underside to prevent sticking if desired) and bake for 20 minutes. Remove the foil and bake for an additional 10 to 12 minutes until the peppers are tender and the cheese is melted and beginning to brown. Garnish and serve: Remove from the oven and let rest 3 to 5 minutes. Sprinkle with 1 tablespoon chopped fresh parsley or cilantro if using, and serve warm. Leftovers can be wrapped individually and refrigerated. Closeup of baked chicken stuffed bell peppers with melted cheese

You Must Know

  • These stuffed peppers freeze well for up to 3 months if wrapped tightly in plastic and foil; thaw overnight in the refrigerator before reheating.
  • High in protein with approximately 24 grams per serving, making this a filling main that pairs well with a simple salad or steamed greens.
  • Because water is added to the baking dish, peppers become tender without turning mushy — keep an eye on oven time and test with a fork at the 28-minute mark.
  • Jarred salsa and seasoning packets can be high in sodium; if you are watching sodium, choose low-sodium salsa and reduce added salt to taste.

One of my favorite things about this recipe is how adaptable it is. The first time I made it, I used leftover rice and an on-sale block of Colby Jack; it still impressed company. Friends often ask for the exact spice blend, so I now keep a homemade taco seasoning on hand to fine-tune heat and salt levels. The family reaction is always predictable: contented smiles, second helpings, and leftovers inventoried immediately.

Tray of colorful stuffed peppers ready to bake

Storage Tips

Store leftovers in an airtight container in the refrigerator for up to 3 to 4 days. For best texture, reheat gently in a 325°F oven until warmed through, about 12 to 15 minutes, or microwave individual portions for 1 to 2 minutes, checking to avoid overheating. To freeze, cool completely, wrap each pepper individually in plastic wrap and then foil, and freeze for up to 3 months. Thaw overnight in the refrigerator and reheat the same way. Use glass or BPA-free plastic containers for fridge storage and heavy-duty foil for long-term freezing to prevent freezer burn.

Ingredient Substitutions

Swap ground chicken for ground turkey, lean ground beef, or plant-based crumbles to suit preferences. Replace cooked white rice with cooked quinoa, brown rice, or cauliflower rice (for a lower-carb option). If you prefer more heat, use medium or hot salsa and add a pinch of cayenne or chopped jalapeño. For dairy-free needs, omit the cheese or use a dairy-free melting alternative; the filling will still be flavorful thanks to the seasoning and salsa.

Serving Suggestions

Serve these stuffed peppers with a crisp green salad and lime wedges for brightness. A dollop of Greek yogurt or sour cream and extra salsa on the side provide cooling contrast. For a heartier meal, accompany with roasted sweet potatoes or a simple black bean salad seasoned with lime and cilantro. Garnish with chopped cilantro for a fresh finish and a sprinkle of smoked paprika for color.

Cultural Background

Stuffed peppers appear in many cuisines worldwide, from Mediterranean dolmas to Mexican rellenos. This American-Mexican inspired version blends familiar Tex-Mex flavors — taco seasoning and salsa — with the stuffed vegetable concept. It reflects a modern home-cooking approach that borrows techniques and tastes from regional traditions while emphasizing convenience and accessibility.

Seasonal Adaptations

In summer, use brightly colored fresh peppers at the peak of sweetness and try fresh pico de gallo in place of jarred salsa for a brighter finish. In cooler months, layered winter squash halves can replace peppers for a seasonal twist, and adding roasted corn and black beans deepens the autumnal profile. Holiday gatherings benefit from an herby gremolata-style garnish to lift the savory filling.

Meal Prep Tips

Make the filling in advance and store it in the refrigerator for up to 24 hours; fill and bake when needed. Alternatively, assemble filled peppers on a sheet tray, cover tightly, and refrigerate for up to a day before baking. For weekly meal prep, bake a double batch and freeze portions individually; this provides quick lunches or dinners on busy days. Label containers with reheating instructions and date for easy use.

With bright color, balanced textures, and simple assembly, these chicken stuffed peppers are an accessible, family-friendly meal that you can customize easily. They pack well for lunches, freeze beautifully, and deliver consistent, comforting results every time — I hope they become a favorite in your rotation as they are in mine.

Pro Tips

  • Use a small dice for the onion so it melts into the filling and distributes evenly.

  • Spray the underside of the foil with cooking spray to prevent melted cheese from sticking.

  • Add 1 tablespoon of tomato paste to the filling while cooking for extra depth if your salsa is very mild.

  • Check peppers at 28 minutes and test tenderness with a fork to avoid overcooking.

This nourishing chicken stuffed peppers recipe is sure to be a staple in your kitchen. Enjoy every moist, high protein slice — it is perfect for breakfast or as a wholesome snack any time.

FAQs about Recipes

How long do leftovers keep?

Yes. Cooked stuffed peppers can be refrigerated for 3 to 4 days in an airtight container. Reheat in a 325°F oven until warmed through.

Can I freeze these?

Freeze wrapped peppers for up to 3 months. Thaw overnight in the refrigerator before reheating.

Tags

Baked & RoastedDinnerMain CourseChickenPeppersAmerican CuisineMexican-InspiredFeastina
No ratings yet

Chicken Stuffed Peppers

This Chicken Stuffed Peppers recipe makes perfectly juicy, tender, and flavorful steak every time! Serve with potatoes and a side salad for an unforgettable dinner in under 30 minutes.

Servings: 6 steaks
Chicken Stuffed Peppers
Prep:15 minutes
Cook:30 minutes
Rest Time:10 mins
Total:45 minutes

Instructions

1

Preheat and prepare dish

Preheat oven to 375°F. Pour 1/2 cup water into a 9x13-inch baking dish and set aside to create steam during baking.

2

Prepare the peppers

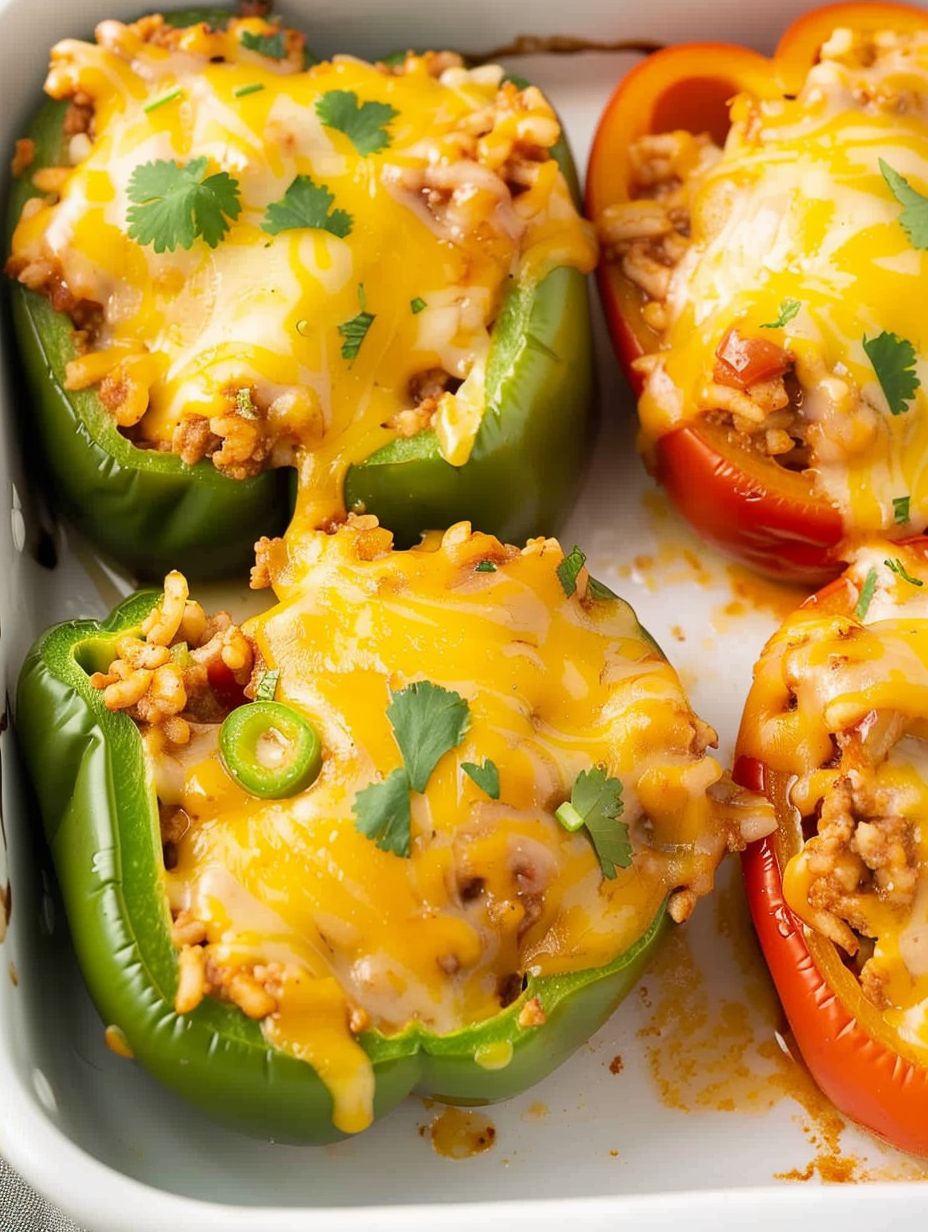
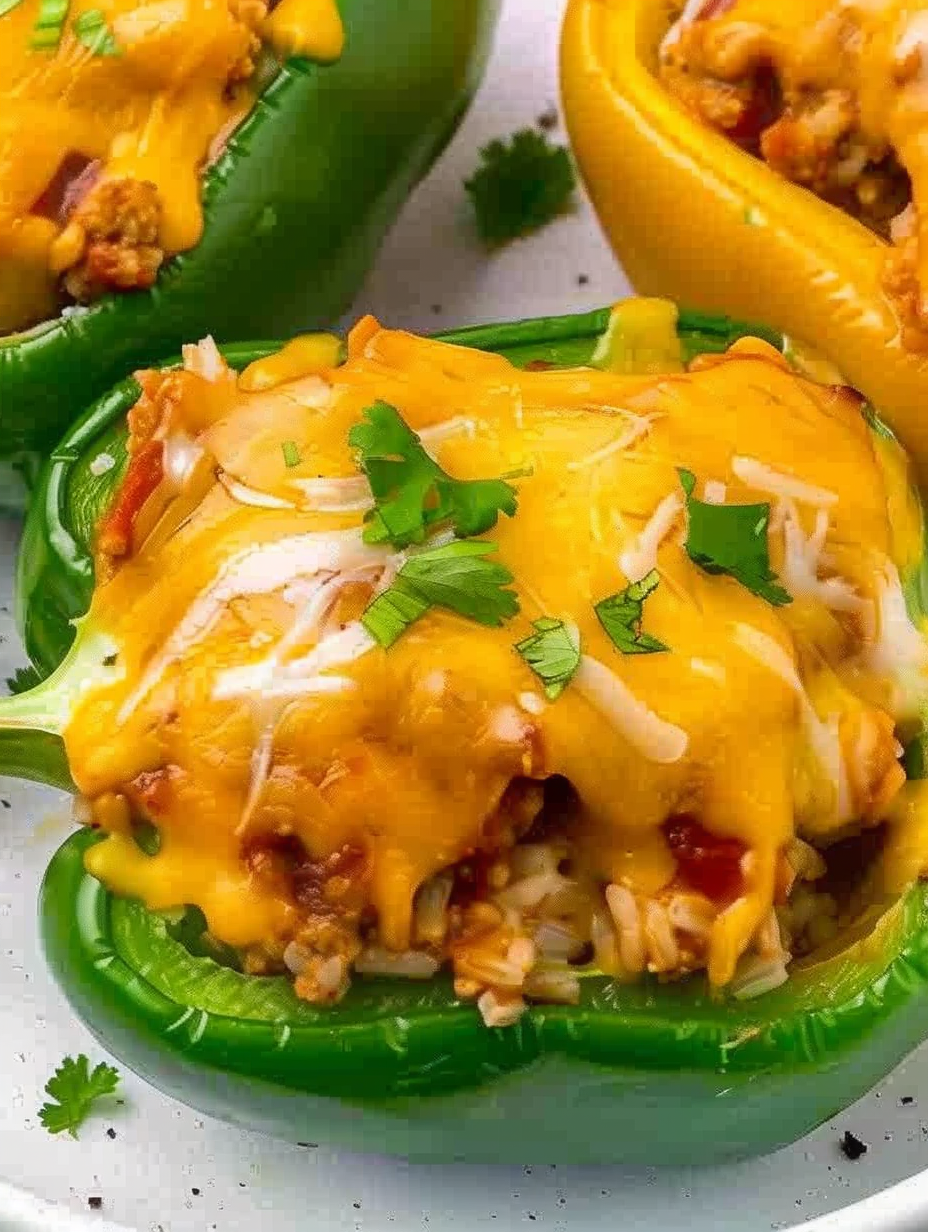
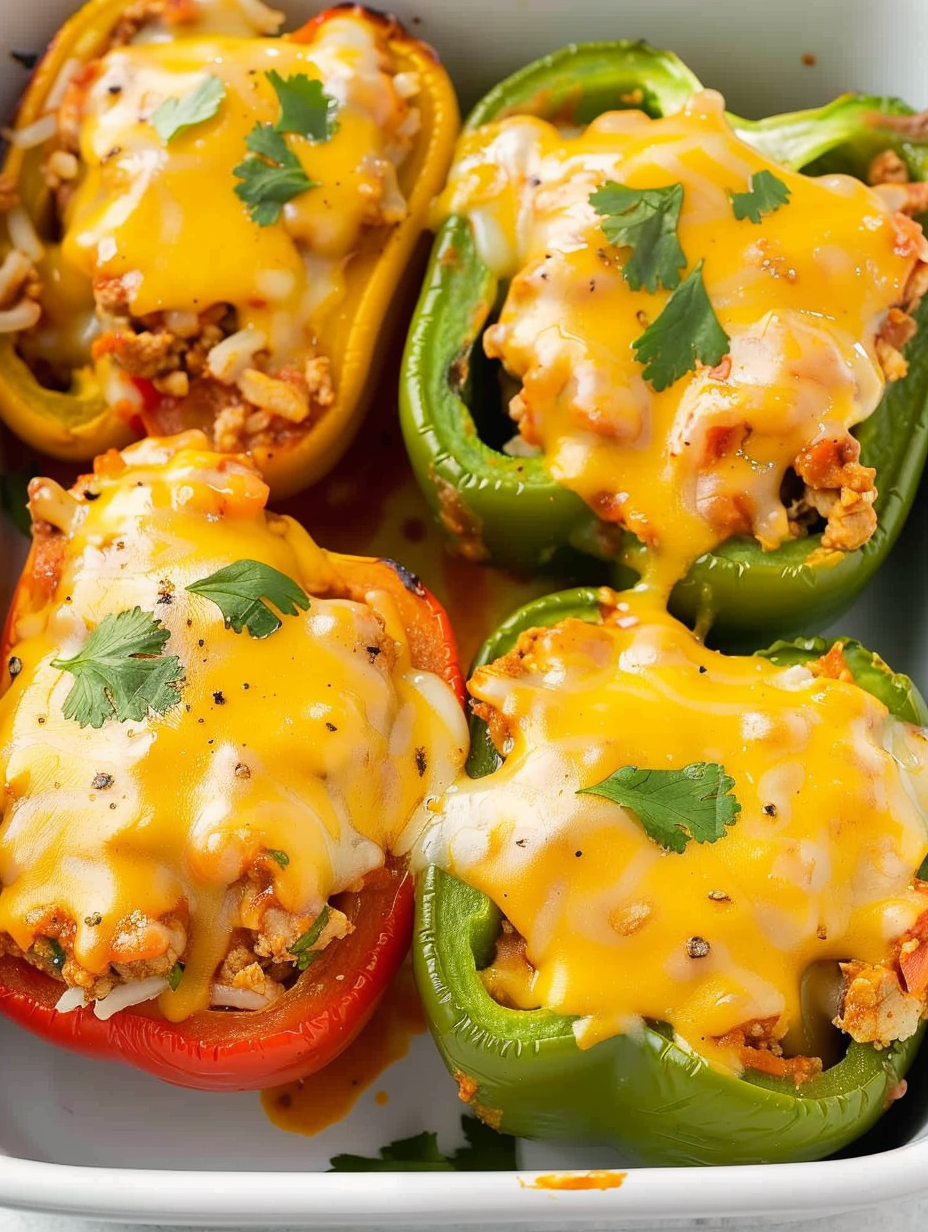
Halve 3 large bell peppers lengthwise and remove stems, veins, and seeds. Arrange cut-side up in a single layer in the prepared baking dish.

3

Sautée chicken and onions

Heat 2 tablespoons olive oil in a large skillet over medium-high heat. Add 1 pound ground chicken and 1/2 cup small-diced onion with 1/2 teaspoon salt and 1/4 teaspoon black pepper. Cook 5 to 6 minutes until no pink remains.

4

Add seasoning and salsa

Stir in a 0.85-ounce chicken taco seasoning packet and 1/2 cup mild salsa. Cook 1 to 2 minutes to combine and concentrate flavors.

5

Combine with rice and fill peppers

Turn off heat and fold in 1 cup prepared white rice. Spoon approximately 1/2 cup filling into each pepper half, smoothing the tops for even cheese coverage.

6

Top with cheese and bake

Sprinkle 8 ounces shredded Colby Jack over the filled peppers. Cover the dish with aluminum foil (sprayed lightly with cooking spray on the underside to prevent sticking) and bake 20 minutes. Remove foil and bake 10 to 12 more minutes until peppers are tender and cheese is melted.

7

Garnish and serve

Let the peppers rest 3 to 5 minutes out of the oven. Garnish with 1 tablespoon chopped parsley or cilantro, then serve warm.

Last Step: Please leave a rating and comment letting us know how you liked this recipe! This helps our business to thrive and continue providing free, high-quality recipes for you.

Nutrition

Calories: 373kcal | Carbohydrates: 18g | Protein:
24g | Fat: 23g | Saturated Fat: 7g |
Polyunsaturated Fat: 5g | Monounsaturated Fat:
9g | Trans Fat: 1g | Cholesterol: 253mg | Sodium:
0mg | Potassium: 953mg | Fiber: 0g | Sugar:
0g | Vitamin A: 577IU | Vitamin C: 3mg | Calcium:
47mg | Iron: 6mg

Did You Make This?

Leave a comment & rating below or tag
@feastinarecipe on social media!

Chicken Stuffed Peppers

Categories:

Chicken Stuffed Peppers

Did You Make This?

Leave a comment & rating below or tag @feastinarecipe on social media!

Rate This Recipe

Share This Recipe

Enjoyed this recipe? Share it with friends and family, and don't forget to leave a review!

Comments (1)

Leave a Comment

0/1000 characters
Food Lover
1 day ago

This recipe looks amazing! Can't wait to try it.

Rating:

Comments are stored locally in your browser. Server comments are displayed alongside your local comments.

Family photo

Hi, I'm Sarah!

Chef and recipe creator specializing in delicious Baked & Roasted cooking. Passionate about sharing easy-to-follow recipes that bring families together around the dinner table.

30-Minute Meals!

Join to receive our email series which contains a round-up of some of our quick and easy family favorite recipes.