
The Best Cocoa Fudge Brownies

Skip the boxed mix and bake thick, chewy, deeply fudgy cocoa brownies with a shiny cracked top — simple ingredients and pro technique for perfect results.
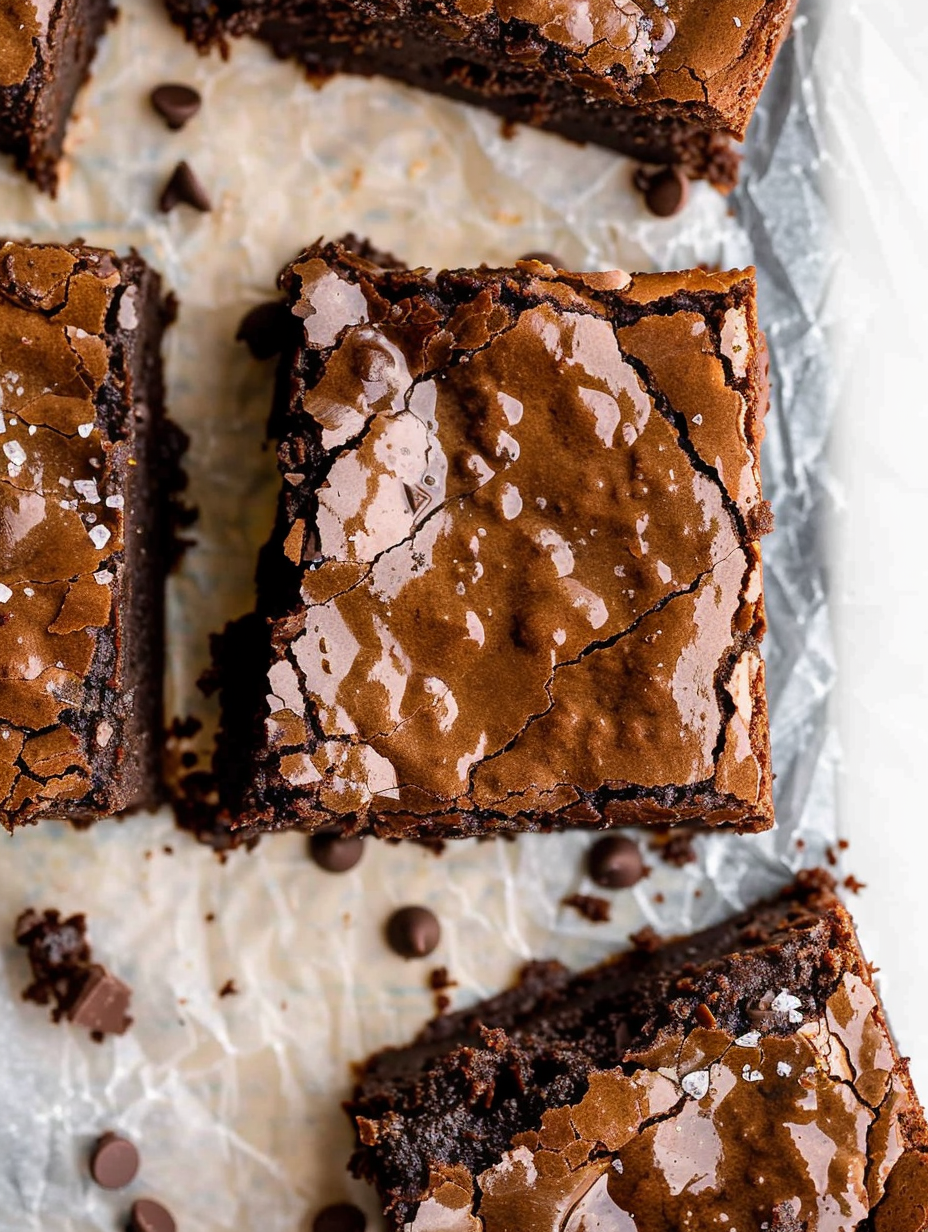
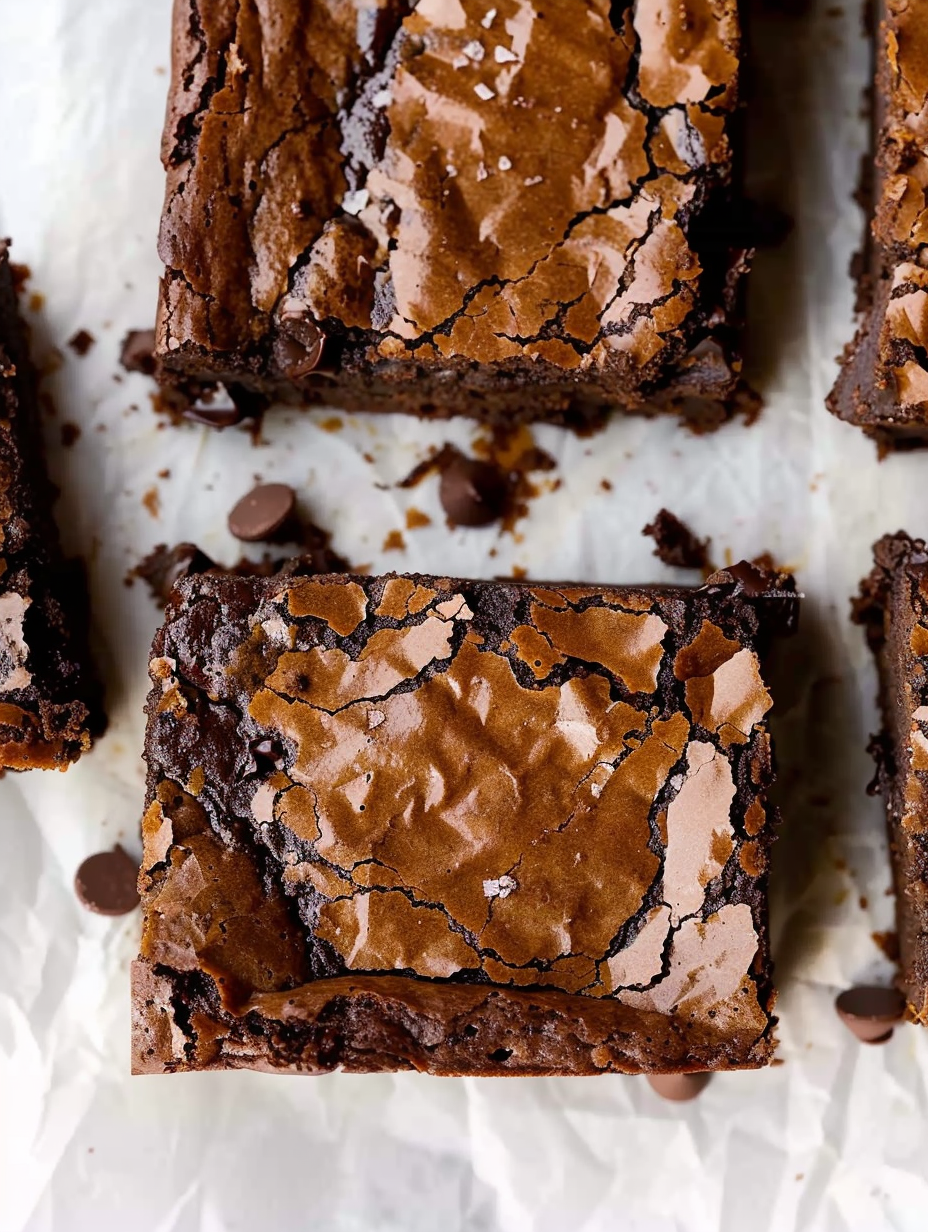
This brownie recipe has been a kitchen staple ever since I first swapped a boxed mix for real cocoa and melted butter. I remember the afternoon I found this combination tucked in an old notebook: a rainy day, a craving for something intensely chocolatey, and a slow melt of butter and sugar on the stove. The result was a pan of brownies so dense, fudgy, and glossy that my family stood around the counter trading bites before the pan cooled. It's become our go-to treat for potlucks, late-night cravings, and holiday trays because it reliably produces thick, chewy squares with a crackly top and deep cocoa flavor.
What makes these brownies special is the method: warming butter and a bit of oil, then incorporating it slowly into beaten eggs and sugar to build shine and texture, and finally folding in dry ingredients just until combined. The balance of unsweetened cocoa and semisweet chips gives depth without cloying sweetness, and an optional touch of espresso powder subtly intensifies the chocolate. These are not cakey bar cookies — they’re deliberately fudgy, so timing and gentle mixing are everything. After years of sharing them with friends, I still get the same delighted reactions: oozy centers, chew at the edges, and that irresistible glossy crackle across the top.
Why You'll Love This Recipe
- Deep, authentic chocolate flavor from unsweetened cocoa powder and melted butter — no boxed mix shortcuts required.
- Quick active prep: about 10 minutes hands-on; the rest is baking and a short cool-down, making it ideal for busy afternoons.
- Uses accessible pantry staples (flour, sugar, cocoa, butter, eggs) and a small amount of oil for an extra glossy, fudgy texture.
- Flexible baking time: pull at 27 minutes for ultra-gooey, or bake to 30–32 minutes for more structured squares that still retain chew.
- Make-ahead friendly: cool completely, then refrigerate or freeze for easy serving later; reheats beautifully for a warm, gooey bite.
- Family- and crowd-pleasing: simple to scale, easy to gift, and a reliable dessert when you want something comforting and impressive.
I first served these at a small dinner where a neighbor brought coffee and we traded stories over warm plates. They disappeared quickly, and I began to refine timing and technique — a slower incorporation of butter, the small addition of oil to enhance chew, and the gentle fold at the end. Ever since, requests for this pan have been the easiest way to brighten someone's day.
Ingredients
- All-purpose flour (1 cup / 120 g): Use a spoon-and-level method when measuring for consistent texture. I prefer King Arthur or another unbleached brand for a neutral flour profile that won’t overpower the chocolate.
- Baking powder (1/2 teaspoon): A small lift helps the brownies hold structure without becoming cakey. Fresh baking powder gives a slight rise to stabilize the edges.
- Salt (1/2 teaspoon): Balances sweetness and amplifies chocolate notes; use fine salt so it blends evenly.
- Unsweetened cocoa powder (1/2 cup / 43 g): Dutch-process or natural will both work; Dutch-process gives a slightly rounder flavor while natural delivers bright cocoa bite. I often use Ghirardelli or Valrhona when I want a deeper finish.
- Espresso powder (1 teaspoon, optional): Not a coffee flavor — it intensifies the chocolate. Skip if you dislike coffee notes, but it’s a small secret ingredient for a more complex profile.
- Unsalted butter (3/4 cup / 170 g): Real butter melts into glossy richness. I always use unsalted so I can control seasoning; if using salted, omit or reduce added salt.
- Neutral oil (2 tablespoons): Canola, vegetable, or coconut — a touch of oil keeps the center tender and adds shine to the top.
- Granulated sugar (1 and 1/3 cups / 265 g), divided: Some sugar is warmed with the butter and oil for texture; the remainder is whisked with eggs to build emulsion and gloss.
- Eggs (2 large) + 1 large egg yolk: Eggs provide structure and richness; the extra yolk increases fudginess and mouthfeel.
- Vanilla extract (2 teaspoons, optional): Adds aromatic sweetness and rounds the edges of the chocolate.
- Chocolate chips (3/4 cup / 128 g): Semisweet chips fold into the batter and melt into pockets of chocolate; use a quality chip or chop a bittersweet bar for better melting and flavor.
Instructions
Prepare the pan and preheat: Preheat the oven to 350°F (175°C). Line a 9x9-inch pan with parchment, leaving an overhang to lift the brownies out. Lightly spray the parchment with nonstick spray so the bottom releases cleanly. Combine dry ingredients: Sift together the flour, baking powder, salt, cocoa, and espresso powder into a large bowl. Sifting removes lumps from the cocoa and aerates the flour so you get even distribution without overworking the batter later. Melt butter and sugar: In a medium saucepan over medium heat, combine the butter, oil, and 1/3 cup of the sugar. Stir frequently until the butter fully melts and the sugar dissolves slightly; you’re not caramelizing it, just warming until homogeneous. Remove from heat to avoid cooking the eggs when combined later. Whisk eggs and remaining sugar: In a separate large bowl, whisk together the 2 eggs, egg yolk, vanilla (if using), and the remaining 1 cup of sugar until smooth and a bit glossy, about 30 seconds. This aeration helps create the shiny cracked top typical of fudgy brownies. Temper the eggs with warm butter: Slowly pour the warm butter mixture into the egg-sugar bowl in a thin, steady stream while whisking constantly. This gradual approach prevents the eggs from scrambling and builds a silky emulsion that yields a tender, glossy batter. Fold in dry ingredients and chips: Add the dry mixture and chocolate chips to the wet mixture. Using a rubber spatula, fold gently until you see the last trace of flour — stop. Over mixing incorporates too much air and develops gluten, which produces cakey brownies rather than dense, fudgy ones. Bake: Scrape the batter into the prepared pan and smooth the top. Bake for 28 to 30 minutes. For very gooey brownies pull at 27–28 minutes; for more set but still chewy centers let them go to 30–32 minutes. The edges should be firm and the top glossy with a slight crackle. Cool and slice: Place the pan on a cooling rack and allow to cool completely — at least 2 hours — before slicing. Cooling sets the interior, making clean cuts and perfect textures possible.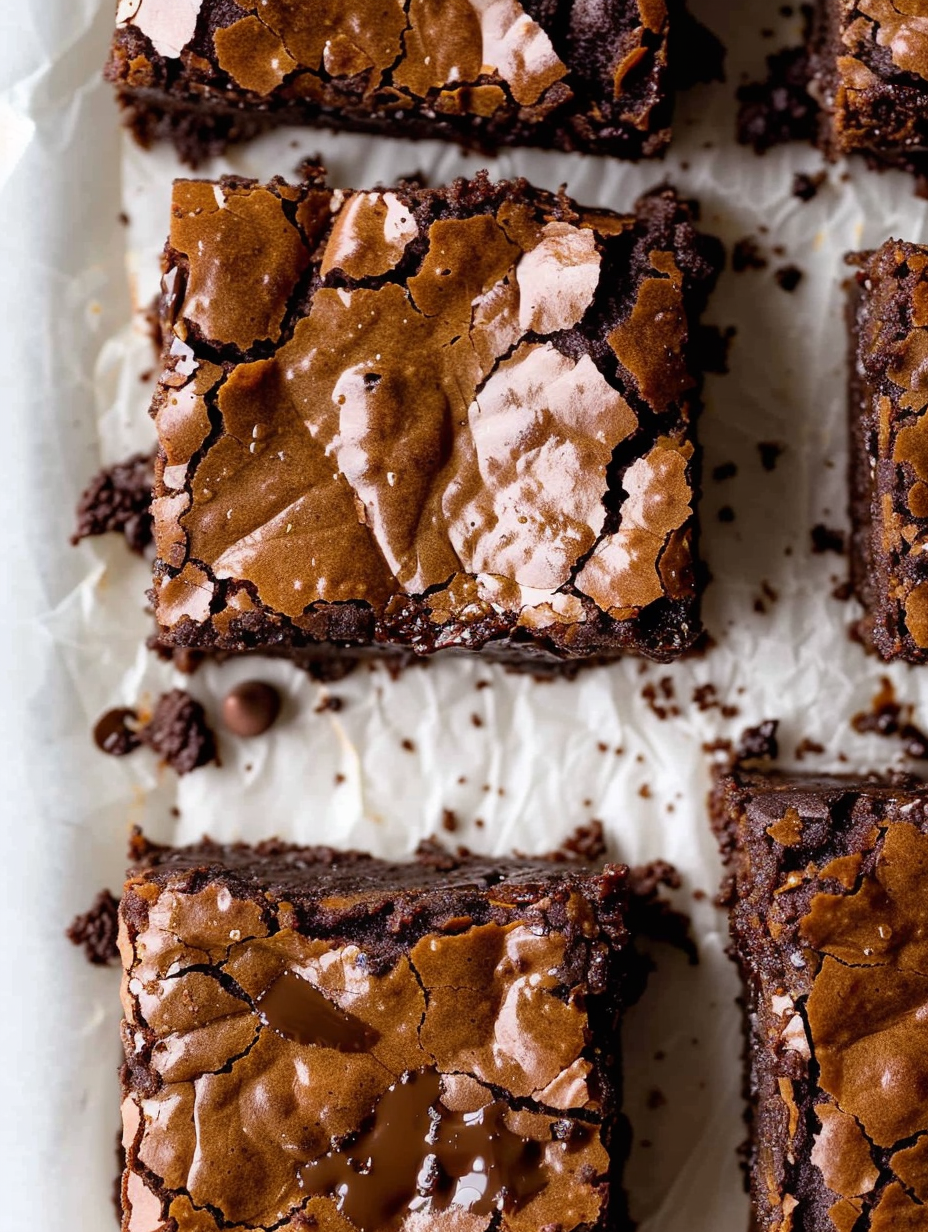
You Must Know
- These hold well at room temperature for 2 days in an airtight container, refrigerated for up to 5 days, and freeze well up to 3 months when wrapped tightly.
- Timing is crucial: underbake a little for gooey centers; overbake and they become more like cake. Use visual cues — glossy cracked top and firm edges — over exact minutes.
- The slow addition of warm butter to eggs builds shine and prevents scrambled eggs; never add hot butter all at once.
- Gentle folding preserves fudginess; stop when the last streak of flour disappears to avoid gluten development and a cakey texture.
I love that a simple change in technique can transform texture. Years ago, my first batch turned cakey because I mixed too vigorously; after experimenting I learned the secret is restraint. Family members now debate whether to warm leftovers in the microwave or oven — both work beautifully — and I still serve these for holidays because they travel and share so well.
Storage Tips
Store cooled squares in an airtight container at room temperature for up to 48 hours; this keeps the edges chewy and the center moist. For longer storage refrigerate for up to 5 days — bring to room temperature or warm briefly before serving to return gooeyness. To freeze, wrap individual squares tightly in plastic wrap, then place in a freezer-safe bag for up to 3 months. Thaw overnight in the refrigerator or microwave for 10–15 seconds for a warm treat. Use parchment between layers to prevent sticking.
Ingredient Substitutions
For dairy-free brownies, swap the butter for a non-dairy solid baking spread and the chocolate chips for dairy-free chips — reduce baking time slightly as plant-based fats behave differently. Gluten-free flour blends designed cup-for-cup typically work, but expect a slightly different crumb. Replace granulated sugar with coconut sugar 1:1 for a deeper caramel note, though color and flavor will shift. Olives oil can replace neutral oil, but expect a subtle fruitier taste; avoid strong-flavored oils.
Serving Suggestions
Serve warm with a scoop of vanilla ice cream and a drizzle of salted caramel for contrast, or dust with powdered sugar and a few flaky salt flakes for a simple presentation. For a party platter, cut into small squares and arrange with berries and whipped cream. These also pair nicely with strong black coffee or a nutty espresso drink to mirror and highlight the chocolate depth.
Cultural Background
Brownies are an American classic that emerged in the early 20th century as a portable, chocolate-sweet bar. Over decades, regional variations evolved — from fudgy to cakey to the addition of nuts or ganache toppings. This cocoa-forward version leans into the fudgy New England tradition of dense, buttery bars with a glossy top, celebrating techniques that prioritize texture and richness over volume.
Seasonal Adaptations
In winter, fold in peppermint chips or a teaspoon of peppermint extract and top with crushed candy cane for a festive touch. In summer, swirl in raspberry jam before baking and top with fresh raspberries after cooling. For autumn, add a pinch of cinnamon and a tablespoon of molasses for warmth. These small swaps let you adapt the same reliable method for every season.
Meal Prep Tips
Make a double batch and freeze half of the batter in the pan wrapped tightly; thaw overnight and bake as needed for fresh brownies. Alternatively, bake and freeze fully cooled squares; individually wrapped pieces are ideal for packed lunches or quick desserts. If you want portion control, score the pan lightly before cooling to guide clean cuts later.
These brownies invite experimentation while reliably delivering the fudgy, chewy texture we all crave. Whether you keep them simple or dress them up, they’re a dependable favorite that brings people together — and that’s the best reason to bake.
Final note: be patient with cooling. The wait is rewarded with perfect slices and tidy serving — and if you can’t resist, a warm corner square is a delightful consolation.
Pro Tips
Measure flour with the spoon-and-level method to avoid too-dry batter which leads to cakey texture.
Slowly temper the warm butter into the eggs to prevent scrambling and to build a glossy top.
Stop folding when the last streak of flour disappears to keep the interior fudgy — over mixing causes cakiness.
For gooey centers, remove the pan at 27–28 minutes; for more structure, bake 30–32 minutes.
Line the pan with parchment and use an overhang for easy removal and neat slicing.
This nourishing the best cocoa fudge brownies recipe is sure to be a staple in your kitchen. Enjoy every moist, high protein slice — it is perfect for breakfast or as a wholesome snack any time.
FAQs about Recipes
Do I have to wait for the brownies to cool before cutting?
Cool completely before slicing to ensure clean edges and set interior; at least 2 hours recommended.
Can I freeze these brownies?
Yes, these freeze well up to 3 months when wrapped tightly; thaw overnight in the refrigerator.
Tags
The Best Cocoa Fudge Brownies
This The Best Cocoa Fudge Brownies recipe makes perfectly juicy, tender, and flavorful steak every time! Serve with potatoes and a side salad for an unforgettable dinner in under 30 minutes.
Ingredients
Brownie Batter
Instructions
Preheat and prepare pan
Preheat oven to 350°F (175°C). Line a 9x9-inch pan with parchment paper and lightly spray with nonstick spray; set aside.
Sift dry ingredients
Sift together flour, baking powder, salt, cocoa powder, and optional espresso powder into a bowl. Set aside until needed.
Melt butter and combine with sugar
In a medium saucepan over medium heat, combine butter, oil, and 1/3 cup sugar. Stir until butter melts and the mixture is uniform, then remove from heat.
Whisk eggs and sugar
In a large bowl, whisk 2 eggs, the egg yolk, remaining sugar, and vanilla (if using) until smooth and glossy, about 30 seconds.
Temper eggs with warm butter
Gradually pour the warm butter mixture into the egg mixture in a slow steady stream, whisking constantly to build an emulsion and prevent scrambling.
Combine batter and fold in chips
Add the dry ingredients and chocolate chips to the wet ingredients. Using a rubber spatula, fold gently until the last streak of flour disappears. Do not over mix.
Bake
Scrape batter into prepared pan, smooth the top, and bake for 28 to 30 minutes. For very gooey brownies pull at 27–28 minutes; for more structure bake 30–32 minutes.
Cool and slice
Place pan on a cooling rack and cool completely (about 2 hours) before slicing to set the interior and achieve clean squares.
Last Step: Please leave a rating and comment letting us know how you liked this recipe! This helps our business to thrive and continue providing free, high-quality recipes for you.
Nutrition
Did You Make This?
Leave a comment & rating below or tag
@feastinarecipe on social media!
Categories:
You might also like...

Lemon Chicken Orzo Soup
Cozy, bright, and ready fast, this Instant Pot lemon chicken orzo soup brings tender chicken, fresh veggies, and a sunny citrus finish.

50 Calorie Strawberry Cheesecakes
Feather-light mini cheesecakes with bright strawberry sauce, a tender biscuit-style base, and creamy filling. Just 47 calories each and irresistibly fresh.

Kahlua Chocolate Cheesecake Bites
Silky mini cheesecakes swirled with melted chocolate and a splash of Kahlua, nestled on Oreo crusts and crowned with fresh whipped cream.
Did You Make This?
Leave a comment & rating below or tag @feastinarecipe on social media!
Rate This Recipe
Share This Recipe
Enjoyed this recipe? Share it with friends and family, and don't forget to leave a review!
Comments (1)
This recipe looks amazing! Can't wait to try it.
Comments are stored locally in your browser. Server comments are displayed alongside your local comments.

Hi, I'm Sarah!
What's Popular

30-Minute Meals!
Join to receive our email series which contains a round-up of some of our quick and easy family favorite recipes.