
Baked Avocado Chicken Burritos

Easy oven-baked burritos stuffed with tender chicken, creamy avocado, melty cheese and cilantro — made with Mission Gluten Free Tortillas for a quick weeknight favorite.
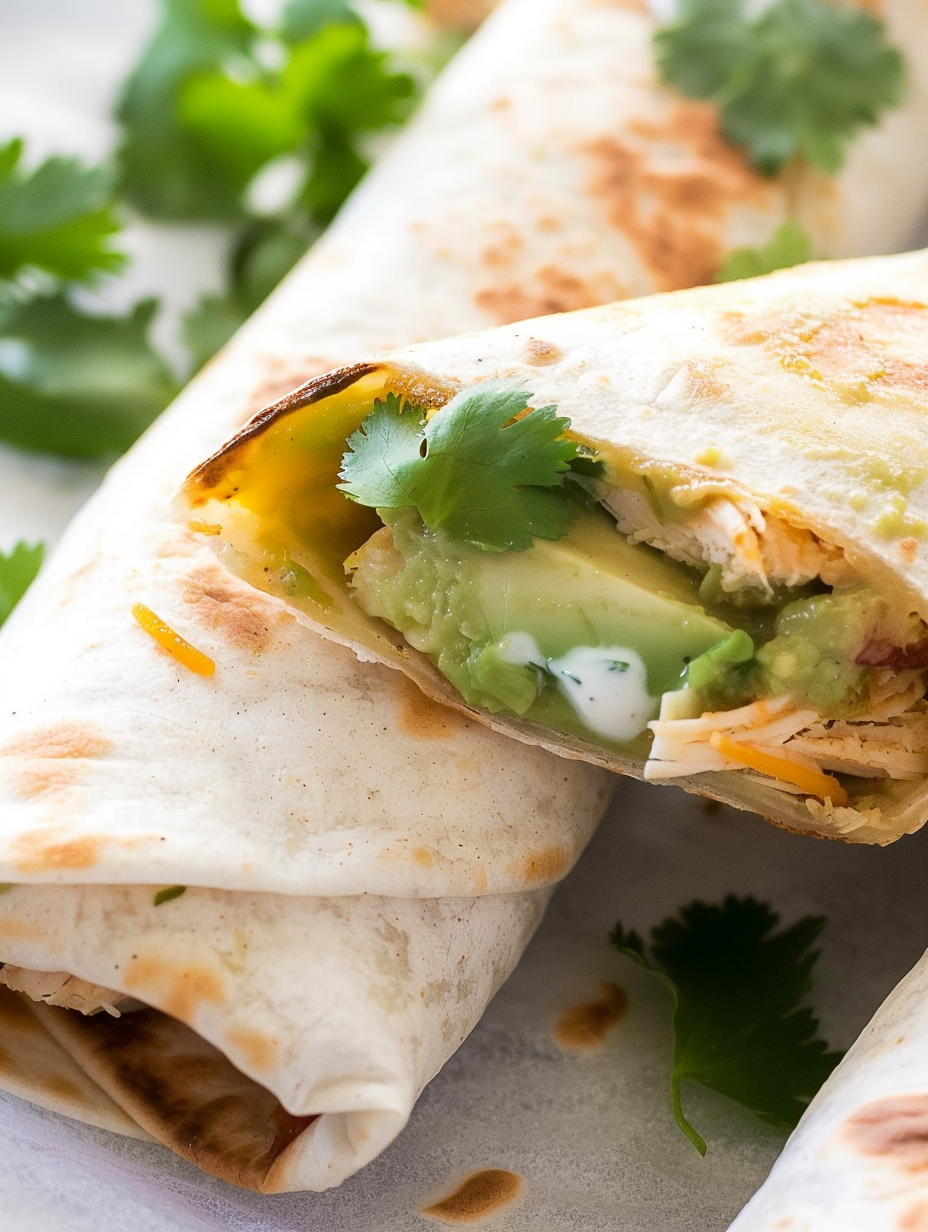
This recipe landed in my weekday rotation the moment I needed a fast, satisfying dinner that would please everyone at the table. I discovered this combination on an afternoon when the fridge was modestly stocked: leftover shredded chicken, ripe avocados on the counter, and a pack of Mission® Gluten Free Tortillas tucked in the pantry. The idea was simple — wrap those ingredients, bake until golden, and serve warm. What resulted was a surprisingly comforting, creamy interior balanced by a toasty exterior that even my most skeptical family members loved.
What makes these baked avocado chicken burritos special is the marriage of textures: soft, slightly tangy avocado paired with warm, seasoned chicken and the gentle stretch of melted cheese. The cilantro and a dollop of sour cream bring freshness and brightness, cutting through the richness. I often make a double batch because they reheat beautifully, and they’ve become my go-to for busy weeknights, quick lunches, and casual gatherings where people want something handheld yet satisfying.
Why You'll Love This Recipe
- Ready in under 35 minutes from start to finish, perfect for busy weeknights when you want something warm and substantial without fuss.
- Uses accessible pantry staples and refrigerator leftovers — 3 cups of cooked chicken and a couple of ripe avocados transform into six generous burritos.
- Made with Mission® Gluten Free Tortillas, so it’s a great option for those avoiding gluten while still delivering the familiar burrito experience.
- Oven-baking gives each wrap a golden, slightly crisp exterior while keeping the inside creamy and moist — no frying necessary.
- Customizable: swap cheeses, add a squeeze of lime, or fold in black beans for extra fiber and heartiness.
- Excellent make-ahead and freezer-friendly potential — assemble, bake or freeze unbaked, then reheat when you need a quick meal.
My family’s reaction the first time I pulled these from the oven was immediate — plates cleared, second helpings requested. I enjoyed learning that a few seconds warming the tortillas on a hot skillet makes rolling so much cleaner, and that a light seam-side bake keeps everything secure and gives the tops a beautiful, golden finish.
Ingredients
- Mission® Gluten Free Tortillas (6): Choose tortillas labeled gluten free; I use Mission® because they stay pliable when warmed and crisp nicely in the oven. Each tortilla should be roughly 8–10 inches for easy rolling.
- Cooked chicken - 3 cups (cubed or shredded): Rotisserie chicken works wonderfully for time savings; leftover roasted chicken or poached chicken shredded into bite-sized pieces keeps the filling juicy and flavorful.
- Avocado - 1 1/2 cups diced (about 2 medium avocados): Use ripe but firm avocados so they hold shape when diced. Hass varieties have the best creaminess and flavor.
- Shredded cheese - 1 1/2 cups: Any melty cheese will do; I prefer a cheddar and Monterey Jack blend for sharpness and creaminess. Pre-shredded or freshly shredded both work.
- Sour cream - 6 tablespoons (optional): Adds tang and silkiness; Greek yogurt can be swapped one-for-one for a lighter finish.
- Fresh cilantro - 6 tablespoons: Roughly chopped cilantro brightens the filling and complements avocado beautifully; measure packed tablespoons of leaves.
- Salt and pepper: To taste for seasoning the chicken and avocado; kosher salt or sea salt recommended.
- Optional additions: Salsa for serving, lime wedges, or a pinch of ground cumin in the chicken for warm, earthy notes.
Instructions
Preheat & Prepare: Preheat the oven to 400°F (200°C) and line a baking sheet with non-stick foil or parchment; this prevents sticking and eases cleanup. Position the oven rack in the center for even browning. Allow the chicken and avocados to come to room temperature for a few minutes if refrigerated, which helps the filling warm evenly once baked. Warm the Tortillas: Heat a large skillet over medium-high heat. Warm each Mission® Gluten Free Tortilla for 10–15 seconds per side — you want them pliable, not browned. Warming prevents cracking when rolling and helps the tortilla adhere when the seam is tucked. Assemble the Filling: In a bowl, toss the cooked chicken with a pinch of salt and pepper, and add a squeeze of lime if using. Pat the diced avocado dry with a paper towel to remove excess moisture and gently fold it with the chicken to avoid mashing. Portion the filling: about 1/2 cup chicken, 1/4 cup avocado, 1/4 cup shredded cheese, 1 tablespoon sour cream, and 1 tablespoon cilantro per tortilla. Roll the Burritos: Place the warmed tortilla on a flat surface, center the filling, fold the short ends in first, then fold one long side over and roll tightly to create a snug cylinder. Place each burrito seam-side down on the prepared baking sheet to help them stay closed during baking. Bake to Finish: Bake for 12–15 minutes at 400°F until the tops are golden brown and the cheese inside has melted. If you like extra crispness, broil for the final 1–2 minutes while watching closely to avoid burning. Serve: Allow the burritos to rest for 2 minutes after baking; this firms the filling slightly for easier handling. Serve with additional cilantro, sour cream, avocado slices, and salsa on the side for dipping.
You Must Know
- These wraps freeze well for up to 3 months when tightly wrapped in foil and stored in a freezer-safe bag; thaw overnight in the refrigerator before reheating.
- High in protein thanks to the chicken; adding black beans boosts fiber and makes them more filling for hungry eaters.
- Avocado will brown if mixed too far in advance; toss with a little lime juice and layer between chicken and cheese to reduce oxidation for short storage.
- Using warm tortillas prevents tearing during rolling and produces a better finished texture after baking.
My favorite part of this combination is how reliably it comes together: simple techniques — warming, gentle folding, and a quick bake — transform straightforward ingredients into something unexpectedly comforting. Over the years, these became the burritos I turn to when I want something homemade but uncomplicated, and they never fail to satisfy at casual dinners or packed lunches.
Storage Tips
To refrigerate, allow the burritos to cool to room temperature and wrap individually in plastic wrap or foil; store in an airtight container for up to 3 days. For freezing, wrap tightly in foil and place in a freezer bag labeled with the date; they will keep for up to 3 months. Reheat refrigerated burritos in a preheated 350°F oven for 10–12 minutes or in a microwave for 60–90 seconds on high, then finish under the broiler or in a hot skillet for crispness. If reheating from frozen, bake at 375°F for 20–25 minutes covered with foil for the first 15 minutes, then uncover to brown.
Ingredient Substitutions
If you need dairy-free options, replace shredded cheese with a plant-based melty alternative and use dairy-free sour cream or plain cashew yogurt. For extra fiber or vegetarian diners, swap chicken for a mix of black beans and roasted sweet potato (use 3 cups combined). If avocados are not in season, substitute with a quick avocado crema (blended silken tofu, lime, and a small amount of olive oil) though texture will be different. Spices like smoked paprika or a pinch of chili powder can be added to the chicken for a deeper flavor profile.
Serving Suggestions
Serve these wraps with a bright side salad of shredded cabbage, carrot, and a lime vinaigrette for crunch. Offer pico de gallo, sliced radishes, and extra cilantro on the side for guests to customize. For a heartier meal, pair with Mexican-style rice or roasted corn with cotija. Garnish with lime wedges and a drizzle of crema to elevate presentation — the contrast of green avocado and golden burrito makes for an inviting plate.

Cultural Background
While not a traditional regional dish, these handhelds are inspired by Tex-Mex and Californian flavors where avocado and cilantro are kitchen staples. The concept of baking stuffed tortillas is a practical adaptation of taquitos and chimichangas — aiming for convenience without deep frying. The use of gluten-free tortillas reflects modern dietary preferences while maintaining the essence of a warm, rolled filling that has become a staple in American home cooking.
Seasonal Adaptations
Spring and summer call for lighter additions: fresh corn kernels, diced tomatoes, and a squeeze of lime complement the avocado’s richness. In cooler months, add roasted poblano or caramelized onions for warmth and depth. During holiday gatherings, increase the batch and include roasted root vegetables for a heartier version that aligns with seasonal produce.
Meal Prep Tips
Assemble burritos without baking and store them seam-side down in a single layer in the refrigerator for up to 24 hours; bake directly from chilled for an extra 2–3 minutes. For frozen meal prep, line them on a baking sheet to flash-freeze for 1 hour before transferring to a bag — this prevents sticking. Label with the date and a reheating note. Portioning ingredients into 6 even scoops ensures consistent size and cooking time.
These baked avocado chicken burritos are simple, flexible, and reliably delicious — a weekday champion. Try a batch this week and adapt fillings to make them your family’s new staple.
Pro Tips
Warm tortillas briefly in a hot dry skillet for 10–15 seconds per side to prevent tearing while rolling.
Toss diced avocado with a teaspoon of lime juice if assembling ahead to slow browning.
Flash-freeze assembled burritos before bagging to prevent them sticking together in the freezer.
If you prefer extra crisp, broil for 1–2 minutes at the end of baking — watch carefully to avoid burning.
This nourishing baked avocado chicken burritos recipe is sure to be a staple in your kitchen. Enjoy every moist, high protein slice — it is perfect for breakfast or as a wholesome snack any time.
Tags
Baked Avocado Chicken Burritos
This Baked Avocado Chicken Burritos recipe makes perfectly juicy, tender, and flavorful steak every time! Serve with potatoes and a side salad for an unforgettable dinner in under 30 minutes.
Ingredients
Tortillas
Filling
Optional
Instructions
Preheat oven and prepare baking sheet
Preheat oven to 400°F (200°C) and line a baking sheet with non-stick foil or parchment. Position the rack in the center for even baking.
Warm the tortillas
Heat a skillet over medium-high heat and warm each gluten-free tortilla for about 10–15 seconds per side until pliable but not browned. This prevents tearing when rolling.
Prepare the filling
Toss the cooked chicken with salt and pepper and, if desired, a squeeze of lime. Pat diced avocado dry and gently fold into the chicken along with chopped cilantro, cheese, and a tablespoon of sour cream per portion.
Assemble the burritos
Place about 1/2 cup chicken mixture, 1/4 cup avocado, 1/4 cup cheese, 1 tablespoon sour cream, and 1 tablespoon cilantro in the center of each warmed tortilla. Fold the short ends in, then roll tightly, placing seam-side down on the prepared sheet.
Bake until golden
Bake at 400°F for 12–15 minutes until the tops are golden and the cheese is melted. For extra crispness, broil 1–2 minutes at the end while watching closely.
Serve and garnish
Let rest 1–2 minutes, then serve with additional cilantro, sour cream, avocado, and salsa. Slice in half or serve whole for handheld enjoyment.
Last Step: Please leave a rating and comment letting us know how you liked this recipe! This helps our business to thrive and continue providing free, high-quality recipes for you.
Nutrition
Did You Make This?
Leave a comment & rating below or tag
@feastinarecipe on social media!
Categories:
You might also like...

Lemon Chicken Orzo Soup
Cozy, bright, and ready fast, this Instant Pot lemon chicken orzo soup brings tender chicken, fresh veggies, and a sunny citrus finish.

50 Calorie Strawberry Cheesecakes
Feather-light mini cheesecakes with bright strawberry sauce, a tender biscuit-style base, and creamy filling. Just 47 calories each and irresistibly fresh.

Kahlua Chocolate Cheesecake Bites
Silky mini cheesecakes swirled with melted chocolate and a splash of Kahlua, nestled on Oreo crusts and crowned with fresh whipped cream.
Did You Make This?
Leave a comment & rating below or tag @feastinarecipe on social media!
Rate This Recipe
Share This Recipe
Enjoyed this recipe? Share it with friends and family, and don't forget to leave a review!
Comments (1)
This recipe looks amazing! Can't wait to try it.
Comments are stored locally in your browser. Server comments are displayed alongside your local comments.

Hi, I'm Sarah!
What's Popular

30-Minute Meals!
Join to receive our email series which contains a round-up of some of our quick and easy family favorite recipes.